Showing posts with label circles. Show all posts

February 26, 2015

Christmas Cards 2014

Okay, try not to panic at the mentioning of 'Christmas' already.  The truth is, I'm a wee bit backlogged in posting so despite the fact that it's nearly March, I still wanted to share my 2014 Christmas cards with you, for inspiration purposes if nothing else.  And let's be honest, I know there are a few of you out there already working on this year's Christmas cards and presents (you know who you are).

Now, having started a job at a new school this academic year, I was feeling slightly more swamped than usual coming up to the holiday season and I was having a hard time coming up with card ideas.  Luckily there's always Pinterest for just such occasions!  I've always loved this card since first seeing it and so used it for my inspiration:


So I set about planning how I could recreate it.  For the circles, I invested in a Martha Steward circle cutter, which (personal feelings concerning Martha Steward aside) is pretty darn awesome and much better than my old and crude circle cutter tool.  I have plenty of ribbon so the scarf wouldn't present a problem but the die cut arms would, as I don't have a die cutter to hand...  And finally, while I could certainly use paint and the circular tip of a paintbrush to stamp out the charcoal bits, I really wanted to ideally use some sort of black rhinestones for dimension but that would require a lot of rhinestones and where would I find those in quantity for a good price?

Happily, it all worked out:

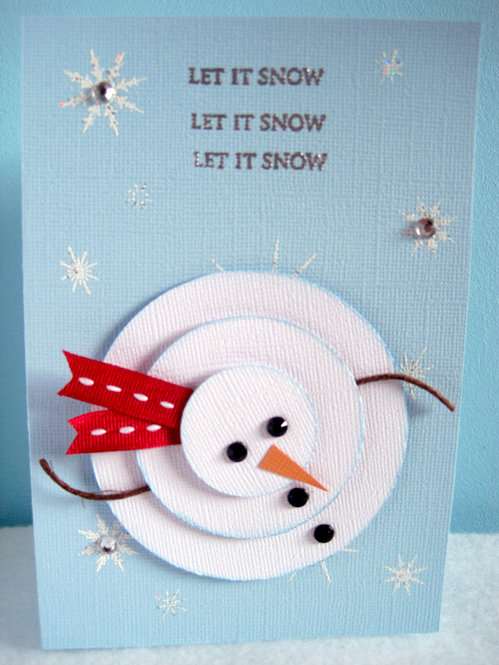
My version

I would have liked to have made them square like in the inspiration card but I make 40-50 cards each year and so I need to buy envelopes in bulk and unfortunately, the dollar store equivalent over here doesn't stock square envelopes in bulk so I went with the traditional A6 sized format instead, which admittedly isn't as nicely balanced but there you go.  Sometimes you just have to think practically.

You can see how nicely the circles turned out using the new circle cutter.  I also decided to ink my circles in a light blue tinge instead of the grey of the inspiration card (which I felt looked a bit dirty and I like my snow pristine looking).  For the background, I stamped a variety of snowflakes and then heat embossed them with a 'snowflake' powder, which is essentially a white with silver flecks mixed in.  I also popped a few clear rhinestones on for a bit of sparkle.

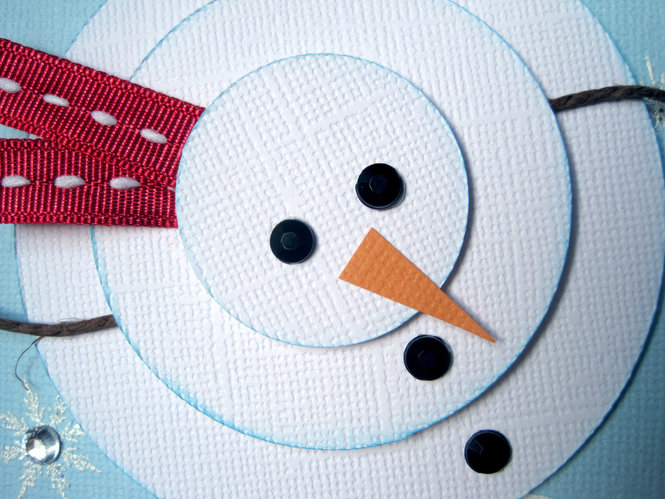
Detail view

A nice bright red ribbon made this little fellow's scarf but I had about five different ribbons that I used so there was a little variety to the set.  For the arms, I decided some dark brown twine would look suitably like branches and add another textural element, which I liked.  And I totally lucked out at the dollar store when I stumbled over massive sheets of colour self-adhering rhinestones, including black!  They were like perfect little chunks of charcoal just waiting for a snowman to adorn!  Serendipity, I tell you.

October 18, 2014

Quilted Triangles Thank You Card Set

Whew!  I survived the crazy week leading up to Thanksgiving, then managed to throw (if I do say so myself) a fantastic Thanksgiving dinner with my closest friends, followed by another - although slightly less crazy - work week.  So, I think that calls for a much-needed blog update.

So with my guild's 10-year anniversary exhibition now over and done with, my friend Ingrid and I decided that the amazing ladies who organised the exhibition should receive some sort of recognition and thank you, if only just from us.  We decided to get them some miniature orchids and that I would make some thank you cards, so that's what we did.


As you can see, I decided to have some fun making little patchwork-like backgrounds from my scrap papers.  I used my still-new Fiskars hexagon punch to create many (many, many) hexagons, which I then cut down into triangles.  They were a lot smaller triangles than I had originally intended but by this point I was committed and honestly, there was something strangely therapeutic about sticking down tiny triangles onto cardstock.  Must just be me.  Yup.


Once glued, I then machine stitched the triangles down.  Then I layered up a small doily and die-cut circle onto each background and used either red/orange or green Thickers to spell out 'tack' (Swedish for 'thank you') as my sentiment.  Finally, a small sprinkling of gold sequins in a visual triangle to finish off the toppers.


Each card in the set is a little different, as I changed up the background base paper and card base colours and all of the die-cut circles were different.  And on the inside of each card I stamped 'thank you, thank you, thank you' in a vertical column.  Needless to say, they went over very well with the recipients.


I've been wanting to do this sort of 'Paige Evans'-style punched shape backgrounds for ages but I don't have a very large selection of punches to use so this was the perfect opportunity.  And while it was a bit fiddly cutting down all of the hexagons into triangles, it didn't actually take very long in the grand scheme of things and wasn't very onerous at all.  I think it all comes down to your own personal level of acceptance on fiddly tasks.


The triangle shapes could also work well for birthday-themed cards, as they give a bunting banner sort of effect.  You could also try this technique with a monochrome colour palette or an ombre effect would also be cool.  You could even add more stitching for a different effect and more texture, too.


Last one!  Cheers, everyone.

May 04, 2014

Pinspiration Sunday

I know, Pinspiration Sunday has been MIA for several weeks now.  Sorry about that.  No real good excuse, just life happening and my attempting to recover from it whenever possible (in good ways, nothing tragic).  Anyway, we're back today so go grab your hot beverage of choice and let's do this!

Currently:

* listening - radio, Mix Top 20
* reading - The Last Letter from Your Lover by Jojo Moyes
* making - HST Sampler Quilt-Along
* eating - nothing yet but hungry for brunch
* drinking - water
* wearing - PJs
* weather - clear but cold, 10C
* feeling - hungry
* wanting - warm weather to return
* needing - to go grocery shopping
* planning - quilting bucket list
* thinking - new list of cards to make this month
* loving - snuggle time with Oskar
* enjoying - crafty goodness

And now on to the pins...

So beautiful and whimsical.  Sadly, this is just a Flickr photo and there is no linked pattern but if you really wanted to do it, you could probably contact the owner and inquire directly.

These little blocks made from fabric scraps are so cheery, they're sure to make a fabulous quilt when all put together.

Utterly adorable little stitched owls.  These would be cute as pin cushions (if you can bare stabbing them with pins, that is), children's toys or just cute decorations.

I also really loved these little bookmarks.  They're made from fabric covered buttons and a bit of elastic and embellishments.  Very cute and clever.

Paper straws have become another trending embellishment but I know many people are stumped with how to use them so here's another idea for working them into your scrapbooking LOs.

Big and bold, this circular design is very eye-catching.  I also really liked how an enlarged photo and the journaling were used inside the circle element instead of just patterned paper.

So simple and elegant, I just love this card.  Beautiful sentiment, too.  This one speaks for itself.

And for all of you Dr. Who geeks out there, how about a cool 3D Tardis card?

And here's a little crafty DIY you could do for your home decor or work into a scrapbooking LO or use as inspiration for sewing and quilting (or whatever hobby you do).

August 18, 2013

Pinspiration Sunday

I missed out on last Sunday's Pinspiration (sorry about that) so today's share is likely to be packed double full of goodies.  So, without further ado, go grab your hot beverage of choice and settle in for the weekly dose of photo love.

Currently:
* listening - Let Her Go by Passenger
* reading - Papercraft Inspirations, August issue
* eating - leftover crayfish party food
* drinking - water
* wearing - PJs
* weather - overcast & windy, 19C
* feeling - lazy
* wanting - my new 2Peas order to arrive
* needing - to stop eating crap and get back into a healthy kick
* thinking - about starting the new academic year with my class tomorrow
* loving - having spent time with close friends last night
* enjoying - not having to be anywhere today

On to the pins...

This quilt really caught my eye; I love everything about it from the geometric design to the choice of fabrics.  I would probably personally skip the little appliqué camper vans but I love their quirky retro style, if I were to include them.

The pie chart trend is still going strong and I really liked the originality of this idea, using both patterned papers, photos and journaling spots to construct a circular chart.  And hey, you can't argue the awesome choice of country featured.  :P

I liked this twist on the quadrant design concept.  I have to admit, I've never really done a quadrant LO before, perhaps because they can often feel very boxy but I really like this alternative and the use of layering helps to break up that stiff, boxy feel.  I think I'm going to have to give this one a go soon.

Another circular design.  I really like the delicate effect of the stitching; lightly anchoring the focus but still retained a softness with all the white space.  And the journaling around the circle is just perfect, along with the tall, skinny title and the three asterisks spaced out.

This is just such a cute idea - simple but elegant and such versatile possibilities.  I'm thinking it will be perfect for a new home card for a friend.

This seems so obvious, I'm ashamed I didn't think of it myself.  I recently bought a package of natural wood mini clothes pegs and thought to myself, "I'll just paint them if I want them coloured." but this is a far better idea.  I'm thinking, drop the little guys in a bottle of spray mist, leave until desired colour, remove to dry - done!  And no worrying about the metal hinge getting painted.

So the Maggie Holmes mini bows have been super popular this year so when I cleaned up my ribbon supply, I decided I would have a go at making some DIY versions using this fork technique and yes, it really does work and is ridiculously quick and easy!  You will need to use a fork with 4 tines and the width of your fork will determine the width of the bow (so if you want really tiny ones, using a skinny fork, etc.).  I found the type of ribbon really affects the overall look of the finished bow.  My organza bows turned out the the nicest while the stiffness of grosgrain ribbons didn't work nearly as well.  Standard satin ribbons looked nice, too.

Here's another fun map idea provided by Google.  You enter your return address information and the destination address into the generator and Google produces a map with the route between the two locations marked out, which you can then print and fold into a custom envelope.  I'm such a geek.

OMG, I just stumbled across this idea today on the 2Peas forums and I think I'm hooked before even doing anything.  I'm linking you to Maria Tiara's video tutorial for how to put these QR codes into your scrappy creations.  I can already say that I'm going to work this into a mini album I plan to make for my friend's birthday - we holidayed together in Barcelona earlier this year and she took a number of videos there and it will blow her mind to find them linked into her album.  And can you imagine pairing this idea with your annual Christmas cards?  Amazeballs!

Colour Field
Here's a little colour palette inspiration for you.  You know I love all things orange but also, the photo is just *gorgeous*!

This is another awesome book community idea (I actually think I might have stumbled across this site several years ago).  The basic idea is to share books freely with others in your community and around the world, with the added bonus of (possibly) tracking the books' journeys.  Here's how it works: you take a book you have and don't plan to keep for yourself, create an ID code from the site's generator and adhere it to the book, then either give it to someone in person or do what's termed a 'wild release' - just leave the book anywhere (in a mall, park bench, museum, playground, community centre - anywhere there are people).  Someone hopefully finds/picks up the book and takes it home to read and enjoy.  Better still, they hopefully notice the ID sticker inside, check out the website and choose to record that they've found the book and where it was found and may continue to send it on its way when they're done with it.  Or not - you never know, but that's also some of the fun and challenge of it.  I have a small collection of books ready for wild release starting later this month and I'm geeked to give it a whirl.  Won't you join and try, too?