Showing posts with label photo enlargement. Show all posts

May 04, 2014

Pinspiration Sunday

I know, Pinspiration Sunday has been MIA for several weeks now.  Sorry about that.  No real good excuse, just life happening and my attempting to recover from it whenever possible (in good ways, nothing tragic).  Anyway, we're back today so go grab your hot beverage of choice and let's do this!

Currently:

* listening - radio, Mix Top 20
* reading - The Last Letter from Your Lover by Jojo Moyes
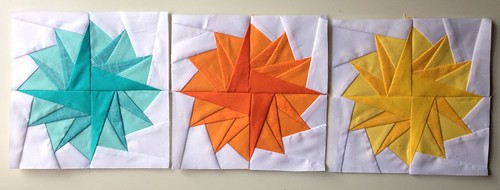
* making - HST Sampler Quilt-Along
* eating - nothing yet but hungry for brunch
* drinking - water
* wearing - PJs
* weather - clear but cold, 10C
* feeling - hungry
* wanting - warm weather to return
* needing - to go grocery shopping
* planning - quilting bucket list
* thinking - new list of cards to make this month
* loving - snuggle time with Oskar
* enjoying - crafty goodness

And now on to the pins...

So beautiful and whimsical.  Sadly, this is just a Flickr photo and there is no linked pattern but if you really wanted to do it, you could probably contact the owner and inquire directly.

These little blocks made from fabric scraps are so cheery, they're sure to make a fabulous quilt when all put together.

Utterly adorable little stitched owls.  These would be cute as pin cushions (if you can bare stabbing them with pins, that is), children's toys or just cute decorations.

I also really loved these little bookmarks.  They're made from fabric covered buttons and a bit of elastic and embellishments.  Very cute and clever.

Paper straws have become another trending embellishment but I know many people are stumped with how to use them so here's another idea for working them into your scrapbooking LOs.

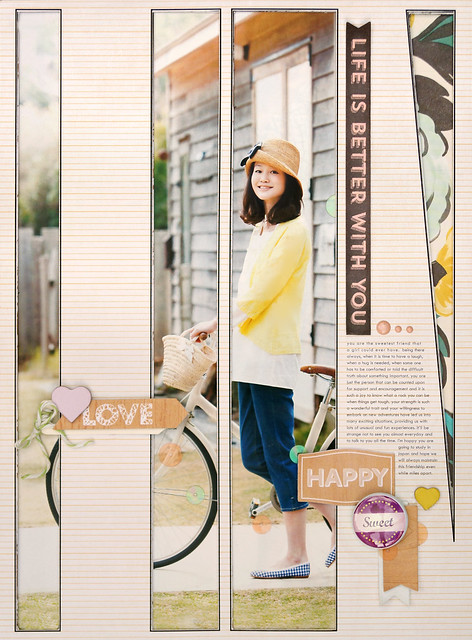
Big and bold, this circular design is very eye-catching.  I also really liked how an enlarged photo and the journaling were used inside the circle element instead of just patterned paper.

So simple and elegant, I just love this card.  Beautiful sentiment, too.  This one speaks for itself.

And for all of you Dr. Who geeks out there, how about a cool 3D Tardis card?

And here's a little crafty DIY you could do for your home decor or work into a scrapbooking LO or use as inspiration for sewing and quilting (or whatever hobby you do).

March 16, 2014

Pinspiration Sunday

Post #100!

Wow, I nearly missed noticing it but this is officially the 100th post!  Furthermore, I've ticked over 9000 page views since this little blog started last summer.  Not too shabby, if I dare say so myself.  And of course, a big thank you to all of you who pop by to read, comment and share in my hobbies and snippets of life.  Now, go grab your hot beverage of choice and we'll get the day officially started with some photo love.

Currently:

* listening - radio
* reading - catching myself up on quilting & papercrafting magazines
* making - layer cake sampler quilt-along
* eating - nothing yet; brunch soon
* drinking - water
* wearing - PJs & cardie
* weather - rainy, 8C
* feeling - hungry
* wanting - to sew, sew, sew!
* needing - to book tickets to Ireland & hostel
* planning - belated Shrove Tuesday (AKA Pancake Day) supper with friends
* thinking - what to do today...
* loving - new fabrics
* enjoying -  lazy Sunday morning in bed

And now on to the pins:

It's chevron, it's turquoise and it's ombre - swoon!  No actual pattern (just HST, after all) but great inspiration and some tips for best effect.

Remember that circle of flying geese pattern I mentioned for my Persian Pickle Project?  Well, take the same paper piecing pattern and make pompoms!

Here's another handy guide for starting free motion quilting, focusing on steps to prepare your machine for the project.

I've been meaning to make a small one of these for ages to put cutlery into when going to quilt guild.  Don't limit yourself just to cutlery, though - you could use these for many different items and adjust the pocket sizes as needed.

I always love Jill's work and these artsy pie charts are such fun!  A nice way to break out of the traditional scrapbooking format and have some fun with scraps, too.

Here's another interesting idea for those of you who want more inspiration for using photo enlargements.  Sandy has cut large slits into her background paper and adhered the photo to the back so that sections peek through to the front - neat visual interest.  I also really like the black doodle lines around each window.

Okay, let me preface this by saying that green is my least favourite colour.  However, this colour palette is just gorgeous!  The mix of limes, turquoise and an unexpected lavender is very refreshing and spring-like.  Love it.

And finally, I stumbled over this adorable quilter's rendition of the 'Soft Kitty' song from Big Band Theory (total fangirl).  Yup, just awesome.

February 20, 2014

Picture Day 2007

Hello, hello!  Yesterday I enjoyed a fun crop day with my friend Anya.  Our last crop day was last summer so it's been a while.  So lovely to chat and craft away together.  And it seems that my stash is now rivaling boutique status, as every item she had forgotten or didn't have on hand and asked me about, I had (and then some).  Oh dear...  At least I can justify using it regularly.

I made two LOs yesterday; wrapping up another class photo.


I finally found some papers that helped to compensate for the green undertones on my last class photo - I off-set the green with some bold magenta and went with a monochromatic scheme to give it some bold impact, what with all of that drab grey back dropping.  The ledger paper is actually upside down and the black and white flowers I fussy cut with my awesome new Fiskars finger craft knife from the photo mat paper.


Embellishments included some Heidi Swapp primrose colour spray and stickers from Echo Park's Here and Now collection and Simple Stories' Vintage Bliss.


I love these Amy Tan Wish Thickers - they are so versatile and I've used them on so many projects.  I knew I wanted to put the class stats in the box at the bottom but that it wouldn't be enough to fill the space so I cut out some little cameras from one of the EP papers (in an ombre, even) and added some machine stitching to fill the gap.


Final embellishment shot with cute ampersand and glasses.

I'll be back tomorrow to share my second LO from the crop day - I was still tweaking it this morning and I want to make sure it's 'done' before releasing it upon the world.

February 18, 2014

Christmas 2013 Portrait

Hello, hello and welcome back!

Okay, so I finally got started on scrapbooking my Christmas 2013 photos.  I don't know about you but I seem to need a little breathing time between returning from Christmas and scrapping Christmas photos and memories.  And if I'm being entirely honest with you, I've also felt a bit intimidated about starting on my Christmas LOs because last year's turned out such a wild success, I think there's been a part of me that wonders how I'll ever recreate just how pleased I was with their results.  Does that sound completely ridiculous?  Well, either way, I finally broke the ice.


There were a number of elements about last year's Christmas LOs that I felt really worked well.  The black and white photos really added a nice elegance and removed the issue of colour clashing between my mother's dark rose and mauve interior design and the typical Christmas red of paper and embellishments.  I also really like using 20x30cm photo enlargements for chapter LOs in my albums so I thought I would repeat that again this year.  In fact, I used the exact same sketch, as it worked so well with this gorgeous framed ledger paper with the pretty Merry Christmas corner design.


This year's supplies will include red/white twine, gold accents (gold lame mist, resin flowers, Thickers, etc.), doilies, enamel dots, probably sequins again and I've also pulled out my wax seals, which I had planned to work into this cluster but the spacing and balance just weren't right for it.


Here's a close-up of that pretty pre-printed corner detail.  I added in some gold lame mist, a tiny bit of stamping and then the embellishments and date number stickers.

And now I'm stuck.  I pulled out the next Christmas photo I wanted to scrap and I just haven't been able to get anything to work with it the way I like.  In reflecting on why this is, I've realised the difference between this year's and last year's collections is that nearly all of this year's papers are very busy and often text-based and therefore not good for writing directly onto.  I'm going to have to add in some additional papers for journaling on (and I don't feel I have much that co-ordinates well), work in journaling cards & tags or try painting over spots to compensate for this.  I'm sure I'll work it out, it's just going to take a bit more playing with than I had expected.  Wish me luck!

November 22, 2013

Picture Day 2010

Hello again, everyone!  So this afternoon at work was field trip day - two hours of skating at the local arena, reliving my youth spent figure skating and coaching 7 and 8-year-olds how to skate.  We had a blast but boy did we come back tuckered out.  I can safely say that I will be curling up extra early in bed tonight once this post is published!  And of course I will need to snag some of the photos the parents took today to scrap later on.

But today we're back to my current series of class photos through the years.  This time it's my class from three years ago, covering academic year 2010-2011.


I decided to return to the Fancy Pants Down by the Shore collection for my background paper; a yellowish/green, blue and white stripe.  I really like how bright and cheery the tropical papers in this collection are and they work really well for children's-themed LOs.  I added in some MME Oxford Lane paper for a photo matte and a Carta Bella Hello Again journaling card and that cute paper chain people border.  Carrying on the camera motif, I decided to use this awesome camera washi tape from Webster's Pages.

I decided to stack up all of the different borders I had pulled, which gave me space to layer the journaling card on the bottom of the page - a nice change from putting it on top again.  I also decided to take advantage of all that white space at the top of the photo and put the title there and bring the embellishment cluster down into the photo - keeping things tight helps to maintain the focus on the photo and leave some breathing room around the sides.


Also related to the camera motif, I added in some View Master reels.  This embellishment cluster combines some washi tape, stickers, spray mist and a scrap of yellow paper I didn't use on a preview project (don't you just love when that happens?).  I also used one of the Hello Again papers - the black sheet with the funky white text.  I cut out some of the words that I felt related to school and sprinkled them in with the embellishments.


And here is my journaling card with stats.  Some more sprinkled words and View Master Slide, washi tape, spray mist and coloured paper clips.  Having recently watched one of Corrie Jones' videos where she used feather accents on a LO, I was inspired to do likewise so I pulled these out from my Studio Calico Sundrifter pack and I really like the effect - a bit elegant but still having a playful element.

This week I also finally got around to scanning my current year's class photo and also the staff photo so I'll be adding those to my next photo order to round out the series.

October 21, 2013

Picture Day 2011

Today I'm sharing another layout in my recent series of class photo scrapping.  I have to say, I really enjoyed making these two layouts.  I think part of the reason is because it's easy to use a simple sketch design and then just rinse and repeat, as it were; and since the photos are always a year apart, there's no real fear that anyone is going to be comparing them side-by-side (and honestly, I wouldn't really care if they did).  I also think I've enjoyed these LOs because I often like scrapping photo enlargements - they're a nice change of pace from 4x6" and they really make a great impact on a page.

So, here is my class from two years ago now...


I really liked how the giant polka dots from the 2012 LO had a fun and colourful child-like feel and I wanted to repeat that with the background paper again.  This time I pulled out Echo Park's Here & Now collection, which I've been dipping in and out of but haven't really made a dent into - yet.  The diagonal stripes brought in a lot of colour without being too over-powering.  I also decided to work in some corrugated cardstock - the navy colour helped pull out the navy in the stripes and somehow I think corrugated card reminds me of school supplies.


I decided to go big and bold with the camera motif this time around and included this banner strip across the top.  And since I was using a lot of pink with the matting paper, it seemed fitting to pull out all the stops and go seriously pink (and glittery!) for the title, too.


All those straight horizontal were feeling very harsh by this point, however, so I added in the twirl of embroidery floss to help break up the lines and give some softness to the page.  And I'm totally loving those chunky cork arrows.  I haven't added banners to my pages recently and I love banners so popped a few of the ones from the Here & Now sticker sheet onto the top edge - staples, bling and done!


Finally, a little journaling card - this one is from the Studio Calico Sundrifter die-cut pack - with the class stats and a little hint of chalkboard with another camera, some extra bling and a fun star paper clip and I called the LO complete.

Now I'm (im)patiently awaiting this year's class photo to finally arrive - I plan to use more chalkboard themed supplies for it.  In the meantime, I still have another handful of years of class photos left to work on but I may have to put those on hold, as the photos for a very special project arrived today - expect a sneak peak soon!

Oh, and to those of you who have left comments that these pages have helped to give you some ideas and inspiration for scrapping your child(ren)'s class photos - that's great to hear and thank you for sharing that with me.  :)

October 19, 2013

Picture Day 2012

I guess having taken in my scrapbooking albums to school (work) recently got me thinking about school photos so I decided to start scrapbooking my annual class photos.  We still haven't received this year's photo but I've collected up most of the previous years', although I'm still trying to hunt down the class photo from my first year teaching PYP 3.  I might have to see if the office at work still has old school catalogues that I can scan or perhaps my parents still have one...

Anyway, I started with last year's class.


I used this fun giant polka dot paper from Fancy Pants' Down by the Shore collection and I love how you would never know it was from a nautical/tropical collection.  I decided I would include camera motifs into all of these pages and many of them will also probably include apples - such as this cute apple paper clip I found at the local TGR.


For the journaling, I decided it would be interesting to record some statistics about each class.  I liked Kirsty Neal's "My Month in Numbers" inspiration and have been thinking about different ways to try to work numbers into my pages more and this seemed like the perfect opportunity to start.


Stay tuned for more up-coming class photos...

August 24, 2013

August Haul & Amsterdam Title Page


Well, I'm happy to say that the first week of classes is over and it's the weekend!  Time for a much-needed rest and a return to crafty goodness.  I have two things to share with you today - the first is a video of my August 2Peas box of goodies (AKA the 'haul' video) and the second is a layout using several of these new supplies - yeah!  So, let's get started, shall we?

My latest purchase has focused on two collections: The Pier by Crate Paper and Hello Again by Carta Bella with a mix of embellishments that will compliment both of these collections and easily be rolled into my existing stash.

Note: My apologies for some of the funky shadows - everything looked fine when I was setting up and of course during filming huge clouds rolled in and blocked out the natural light.  And a freight train chose to pass by half way through, too - the unpredictability of living on an active railway.


And now a new layout using some of these fun, new supplies.  This is a title page to go into my travel album for my Netherlands chapter.


It features a photo enlargement from Keukenhof Gardens and I chose the large, rainbow chevron paper from The Pier to compliment and draw out the beautiful colours of the flowers in the photo.  I also used the Kensei chipboard Thickers for the title and layered them on top of my photo in some white space.


I wanted to keep the embellishments somewhat simple so as not to detract from the photo but I just couldn't resist clustering in some slide frames.  I backed each of them with coloured paper and layered up stickers, flair and a cork arrow.  I also used a few more of my Amy Tan Yes, Please vellum stickers - the tree was just too perfect for this LO and I loved how perfectly the 'delightful' sticker fit into the frame and paired it with a 'memories' phrase sticker, which leads nicely into the title further along the page.

And that's it - just keeping it simple today.  I feel like I've been out of my scrapping routine for some time now am feeling a little rusty so this was a nice warm up to get back into the groove.  Expect more soon.