Showing posts with label cork. Show all posts

December 09, 2015

Heritage Photo - Familjen

Hello, hello!

Welcome back to the final installment of my friend's heritage photo project series.  If you've missed the first two layouts in the series, you can find them here and here.  Today we're checking out the last layout, which features a fabulous photo of Bertil with a handmade toy bow and arrow, a portrait of him and the family together.  I have to say, I absolutely adore that bow and arrow photo!


Background is again from Webster's Pages.  This teal woodgrain paper has long been a favourite of mine so it's pretty special that I'm giving the last I have of it away but it was just too perfect with these photos to not use.  This LO also used up the last of that cute ruler washi tape but I managed to eek it out across the bottom.


That little gap in the title between the l and j was the perfect opportunity to add a little embellishment.  I unfortunately hadn't brought my heart punch with me and after many failed attempts at drawing a symmetrical heart the right size with which I was happy, I decided to go for a funkier heart style instead.


Embellishment cluster above that awesome bow and arrow photo - just look at the expression on that adorable face!  The cork star on the right had been an embossing attempt that I wasn't thrilled with on another project but I liked the look of for this one - you have to love when that happens.


And a bit of embellishment at the bottom of the photo to tie it all together.

And that's it!  My friend will be giving these to her brother as a belated birthday gift and I'm eager to hear what his reaction to them is.  Birgitta is thrilled with them at any rate.  Next year we'll work on the lock of hair and photos for her sister.

December 04, 2015

Heritage Photo - Syskon

Hi again!

Today I'm sharing the second layout in my friend's heritage photo project.  If you missed the first LO, you can see it here.

This second LO features photos of the three siblings together.  The original photo of Bertil holding their baby sister was very small, dark and a bit damaged but the photo development company did a lovely job at scanning, enlarging and reprinting it and in such a way that the lighting now helps to draw your eye into the two children.


The background papers are from Webster's Pages by Adrienne Looman.  The embellishment clusters feature arrows and hearts and I purposely put down the washi tape so that it counted up to three to reflect the number of siblings.  I also used some stamping on this LO, even though it's in English it fitted the theme well.  Birgitta may go back and write on the journaling card so I've left it open for her, should she decide to do so.


Pink chevron arrow is from Crate Paper; which I chose because of the aged look and the weathered cello tape accents.


The stamping for the arrows was done on a branding strip, which was the perfect size.  Hearts and rhinestones with gold lame spatters are layered up on the embellishment clusters.


The bottom embellishment cluster features three arrows, again symbolising the three siblings, and a little stamping with a roller stamp that fitted well with the photo of brother and baby sister together.

Thanks for stopping by; be sure to come back for the final LO installment.

March 16, 2015

Mini Album: Sweden - Part V

Welcome back!

If you've been following this mini series, you'll know that I've been sharing a mini album about my friend Adam visiting me over the summer.  You can find the previous chapters here: chapter 1, chapter 2, chapter 3 and chapter 4.  And now, the final chapter 5: Copenhagen, Denmark.

Chapter 5: Copenhagen

The Little Mermaid

Copenhagen itinerary

Danish royal crown jewels

Leaving our mark on the Happiness Wall

Hop on/hop off bus tour sights

Canal at Nyhavn

Tivoli

At the end of this chapter I also included a few extra random tidbits:

Notes from a random sick day

Goodbye note

Extra photos & keepsakes envelope

And that's it!  Once carefully wrapped, it made its way over the Atlantic to Adam.  He absolutely loved it - worth every ounce of panic and stress getting it done in time.


Thanks for following along!

November 29, 2014

Little One...Hello

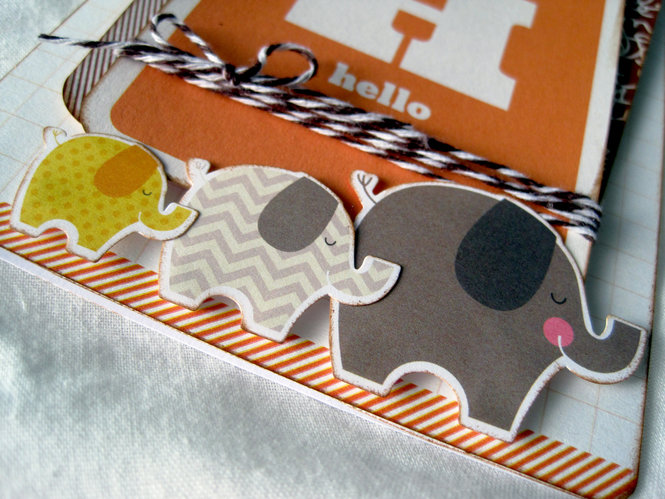
Earlier this month friends of mine had a baby boy.  Naturally this meant that a baby card was in order.  I got to work straight away and in very little time came up with this (if I do say so myself - and I do) adorable card.


Now, would you believe that this card was entirely made from supplies from the Project Life baby girl kit?  Yes, indeed.  Everyone I know recently has been having baby girls and so my stash of baby related papercrafting is overloaded with pink, frilly cuteness.  And then suddenly a baby boy.  Well, I was up to the challenge.

I started shifting through the Project Life cards, looking for any non-pink possibilities.  Now, don't get me wrong, I see no problem in little boys having pink things and dolls and I certainly see nothing wrong with little girls having blue things and playing with Tonka Trunks but it's probably safest to play the gender neutral card in these situations.  So...I went with the fab retro orange and brown combination.


The elephants, stars and moon are from the Simple Stories baby girl collection kit and aren't they just the cutest?  I piled the elephants up on the bottom in a little family train.


Having added the elephants, there was suddenly this yellow from the baby elephant that was out of sync with the rest of the design and colour palette so I searched the Simple Stories sticker sheet for a way to bring more yellow into the card.  I found the moon and added some stars to make a visual triangle.  The cork cloud was a nice way of anchoring the stars and adding another texture and dimension of brown at the same time.

Finally - and I didn't take a photo of this part - I added the sentiment inside.  And to my horror, as I was writing out my note to my friends, I misspelt one of the words!  No!  What to do, what to do?  I grabbed for a package of word stickers and found a selection that not only fit with the message but even worked with the colour scheme and completely covered up my faux pas - whew!

February 22, 2014

An Elf's Work is NEVER Easy

I have a second LO I worked on the other day during my crop with Anya.  I decided to knuckle down and tackle my Christmas photos again.  Before we get to the LO goodies, I do have a little review of my thoughts on this year's collection choice.

As I mentioned in a previous post, I was struggling with using the Reflections Christmas collection I bought for my 2013 Christmas series.  A large part of this difficulty I realised, was due to the majority of the papers either being very bold text prints or dark/busy patterns that don't work well with journaling directly onto the background papers.  As a result, I've had to mix in a lot more patterned paper from other collections, which is fine but I really enjoyed just sticking to the one collection last year.

I've also noticed that the Reflections Christmas has two different values of red, which don't really go well together - especially the red letter stickers with the crimson patterned paper.  That's been a bit disappointing so I've been resorting to other letter stickers and Thickers, which again is fine but shouldn't have to be the case and using just those that typically come with the collection helps retain unity across different pages in a series.

My final critique of Reflections Christmas is that the sticker sheet isn't as versatile as last year's.  There are a lot of repetitive tags/banners that say 'Christmas'; more than necessary, IMO - and yet not enough shaped element stickers.  There also seem to be significantly more large stickers (again, large tags or banners), so that overall there are fewer stickers on the sheet.  I find myself looking over the options feeling like I'm missing something when I get to embellishing.

Now, don't get me wrong - I love Echo Park collections and Lori Whitlock's in particular!  But I don't feel that this specific collection was thought through thoroughly enough in these regards.  It's still a beautiful collection, but it needs a little tweeking.


Okay, on to the LO!  This is a little story about the balancing act that is being the Christmas Elf who hands out the gifts on Christmas Day.  I added in a 6x6 paper from Dear Lizzy's Lucky Charm for the journaling block.


Most of the embellishments are from the sticker sheet, although I also worked in an OA label sticker, Crate Paper border sticker (The Pier browns work really nicely with Reflections Christmas) and some Fancy Pants cork embellishments.  I also used some pretty red rhinestones I picked up from the local craft shop - I had been thinking of using enamel dots but Christmas requires some special sparkle.


For the title, I opted for Crate Paper's Funkydori Thickers.  Even though the word 'never' is all in captials, I wanted it to stand out a little more and have some extra special treatment so I used my brown distress ink and applicator to give it an ombre effect.


And here you can see those luscious red rhinestones and some of the fun twine twisted around the corner.  I also wanted to add in some wax seals.  I used to seal all of my handmade Christmas card envelopes with wax seals a number of years ago, but it takes a long time when you're doing 50 or so cards so I sort of slowly stopped doing it but I love the look and thought it would be a nice addition to my LOs.

February 18, 2014

Christmas 2013 Portrait

Hello, hello and welcome back!

Okay, so I finally got started on scrapbooking my Christmas 2013 photos.  I don't know about you but I seem to need a little breathing time between returning from Christmas and scrapping Christmas photos and memories.  And if I'm being entirely honest with you, I've also felt a bit intimidated about starting on my Christmas LOs because last year's turned out such a wild success, I think there's been a part of me that wonders how I'll ever recreate just how pleased I was with their results.  Does that sound completely ridiculous?  Well, either way, I finally broke the ice.


There were a number of elements about last year's Christmas LOs that I felt really worked well.  The black and white photos really added a nice elegance and removed the issue of colour clashing between my mother's dark rose and mauve interior design and the typical Christmas red of paper and embellishments.  I also really like using 20x30cm photo enlargements for chapter LOs in my albums so I thought I would repeat that again this year.  In fact, I used the exact same sketch, as it worked so well with this gorgeous framed ledger paper with the pretty Merry Christmas corner design.


This year's supplies will include red/white twine, gold accents (gold lame mist, resin flowers, Thickers, etc.), doilies, enamel dots, probably sequins again and I've also pulled out my wax seals, which I had planned to work into this cluster but the spacing and balance just weren't right for it.


Here's a close-up of that pretty pre-printed corner detail.  I added in some gold lame mist, a tiny bit of stamping and then the embellishments and date number stickers.

And now I'm stuck.  I pulled out the next Christmas photo I wanted to scrap and I just haven't been able to get anything to work with it the way I like.  In reflecting on why this is, I've realised the difference between this year's and last year's collections is that nearly all of this year's papers are very busy and often text-based and therefore not good for writing directly onto.  I'm going to have to add in some additional papers for journaling on (and I don't feel I have much that co-ordinates well), work in journaling cards & tags or try painting over spots to compensate for this.  I'm sure I'll work it out, it's just going to take a bit more playing with than I had expected.  Wish me luck!

November 10, 2013

Pinspiration Sunday

Hello, everyone.  It's been one of those grey, dreary and rainy Sundays, which has meant Oskar and I have curled up in bed and I've been busy, busy, busy online.  That should translate to more to share here on the blog shortly.  Now, go grab your hot beverage of choice and come join me in snuggling up for some photo goodies.

Currently:

* watching - Restoration House Nightmare
* reading - McCall's Quick Quilts - Nov/Dec. issue
* eating - toast and peanut butter
* drinking - water
* wearing - PJs
* weather - rainy, 7C
* feeling - peckish
* wanting - to stay curled up at home
* needing - to start making my Christmas cards
* planning - to finally buy new trousers tomorrow (I hope)
* thinking - I should have bought groceries today...
* loving - having ordered a new box of goodies from 2Peas!
* enjoying - a quiet afternoon at home

And now on to the pins...

Super simple quilt of chevrons and rectangular blocks.  Lovely, cheery colours, although I question using white for a picnic quilt.  ;)

Are you (like me) short on space to lay out quilts for basting?  This might be something you want to have a go with, then - basting using two 1x3" boards, which can be set up on a kitchen table.  No more crawling around on your knees or aching back.

How gorgeous is this rainbow on black embroidery panel?  It makes me think of some celestial nebula.

Tips from 2Peas Garden Girl, Jill Sprout, on journaling about yourself; a topic that many scrapbookers find challenging but is - IMO - so important.

Freckled Fawn is now stocking their own flair and boy, are they cute!  Four sets to choose from currently, each set contains two flair.

Can't get enough cork on your scrapbook pages?  Check out these cute stamped frames?  I might need this set for my next up-coming birthday.  :)

Such a simple but great idea for recolouring staples instead of buying pricier coloured versions.  Keep this in mind for your Christmas cards and layouts this year!

I still need to try this technique - works for any magazine pictures and certain types of printed pictures.

And in honour of Remembrance Day tomorrow, I'm sharing this beautiful poppy-inspired colour palette.  My most heart-felt thanks and appreciation to all of those who have served; to those who possess the strength that I do not.

October 21, 2013

Picture Day 2011

Today I'm sharing another layout in my recent series of class photo scrapping.  I have to say, I really enjoyed making these two layouts.  I think part of the reason is because it's easy to use a simple sketch design and then just rinse and repeat, as it were; and since the photos are always a year apart, there's no real fear that anyone is going to be comparing them side-by-side (and honestly, I wouldn't really care if they did).  I also think I've enjoyed these LOs because I often like scrapping photo enlargements - they're a nice change of pace from 4x6" and they really make a great impact on a page.

So, here is my class from two years ago now...


I really liked how the giant polka dots from the 2012 LO had a fun and colourful child-like feel and I wanted to repeat that with the background paper again.  This time I pulled out Echo Park's Here & Now collection, which I've been dipping in and out of but haven't really made a dent into - yet.  The diagonal stripes brought in a lot of colour without being too over-powering.  I also decided to work in some corrugated cardstock - the navy colour helped pull out the navy in the stripes and somehow I think corrugated card reminds me of school supplies.


I decided to go big and bold with the camera motif this time around and included this banner strip across the top.  And since I was using a lot of pink with the matting paper, it seemed fitting to pull out all the stops and go seriously pink (and glittery!) for the title, too.


All those straight horizontal were feeling very harsh by this point, however, so I added in the twirl of embroidery floss to help break up the lines and give some softness to the page.  And I'm totally loving those chunky cork arrows.  I haven't added banners to my pages recently and I love banners so popped a few of the ones from the Here & Now sticker sheet onto the top edge - staples, bling and done!


Finally, a little journaling card - this one is from the Studio Calico Sundrifter die-cut pack - with the class stats and a little hint of chalkboard with another camera, some extra bling and a fun star paper clip and I called the LO complete.

Now I'm (im)patiently awaiting this year's class photo to finally arrive - I plan to use more chalkboard themed supplies for it.  In the meantime, I still have another handful of years of class photos left to work on but I may have to put those on hold, as the photos for a very special project arrived today - expect a sneak peak soon!

Oh, and to those of you who have left comments that these pages have helped to give you some ideas and inspiration for scrapping your child(ren)'s class photos - that's great to hear and thank you for sharing that with me.  :)

October 19, 2013

Picture Day 2012

I guess having taken in my scrapbooking albums to school (work) recently got me thinking about school photos so I decided to start scrapbooking my annual class photos.  We still haven't received this year's photo but I've collected up most of the previous years', although I'm still trying to hunt down the class photo from my first year teaching PYP 3.  I might have to see if the office at work still has old school catalogues that I can scan or perhaps my parents still have one...

Anyway, I started with last year's class.


I used this fun giant polka dot paper from Fancy Pants' Down by the Shore collection and I love how you would never know it was from a nautical/tropical collection.  I decided I would include camera motifs into all of these pages and many of them will also probably include apples - such as this cute apple paper clip I found at the local TGR.


For the journaling, I decided it would be interesting to record some statistics about each class.  I liked Kirsty Neal's "My Month in Numbers" inspiration and have been thinking about different ways to try to work numbers into my pages more and this seemed like the perfect opportunity to start.


Stay tuned for more up-coming class photos...

August 24, 2013

August Haul & Amsterdam Title Page


Well, I'm happy to say that the first week of classes is over and it's the weekend!  Time for a much-needed rest and a return to crafty goodness.  I have two things to share with you today - the first is a video of my August 2Peas box of goodies (AKA the 'haul' video) and the second is a layout using several of these new supplies - yeah!  So, let's get started, shall we?

My latest purchase has focused on two collections: The Pier by Crate Paper and Hello Again by Carta Bella with a mix of embellishments that will compliment both of these collections and easily be rolled into my existing stash.

Note: My apologies for some of the funky shadows - everything looked fine when I was setting up and of course during filming huge clouds rolled in and blocked out the natural light.  And a freight train chose to pass by half way through, too - the unpredictability of living on an active railway.


And now a new layout using some of these fun, new supplies.  This is a title page to go into my travel album for my Netherlands chapter.


It features a photo enlargement from Keukenhof Gardens and I chose the large, rainbow chevron paper from The Pier to compliment and draw out the beautiful colours of the flowers in the photo.  I also used the Kensei chipboard Thickers for the title and layered them on top of my photo in some white space.


I wanted to keep the embellishments somewhat simple so as not to detract from the photo but I just couldn't resist clustering in some slide frames.  I backed each of them with coloured paper and layered up stickers, flair and a cork arrow.  I also used a few more of my Amy Tan Yes, Please vellum stickers - the tree was just too perfect for this LO and I loved how perfectly the 'delightful' sticker fit into the frame and paired it with a 'memories' phrase sticker, which leads nicely into the title further along the page.

And that's it - just keeping it simple today.  I feel like I've been out of my scrapping routine for some time now am feeling a little rusty so this was a nice warm up to get back into the groove.  Expect more soon.