Showing posts with label card. Show all posts

February 26, 2015

Christmas Cards 2014

Okay, try not to panic at the mentioning of 'Christmas' already.  The truth is, I'm a wee bit backlogged in posting so despite the fact that it's nearly March, I still wanted to share my 2014 Christmas cards with you, for inspiration purposes if nothing else.  And let's be honest, I know there are a few of you out there already working on this year's Christmas cards and presents (you know who you are).

Now, having started a job at a new school this academic year, I was feeling slightly more swamped than usual coming up to the holiday season and I was having a hard time coming up with card ideas.  Luckily there's always Pinterest for just such occasions!  I've always loved this card since first seeing it and so used it for my inspiration:


So I set about planning how I could recreate it.  For the circles, I invested in a Martha Steward circle cutter, which (personal feelings concerning Martha Steward aside) is pretty darn awesome and much better than my old and crude circle cutter tool.  I have plenty of ribbon so the scarf wouldn't present a problem but the die cut arms would, as I don't have a die cutter to hand...  And finally, while I could certainly use paint and the circular tip of a paintbrush to stamp out the charcoal bits, I really wanted to ideally use some sort of black rhinestones for dimension but that would require a lot of rhinestones and where would I find those in quantity for a good price?

Happily, it all worked out:
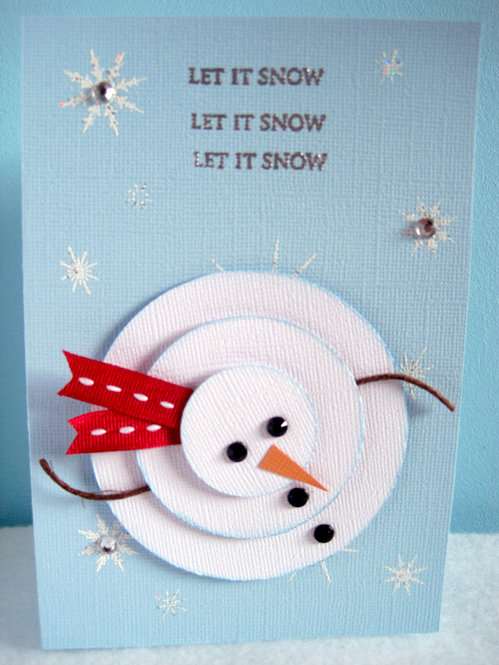
My version

I would have liked to have made them square like in the inspiration card but I make 40-50 cards each year and so I need to buy envelopes in bulk and unfortunately, the dollar store equivalent over here doesn't stock square envelopes in bulk so I went with the traditional A6 sized format instead, which admittedly isn't as nicely balanced but there you go.  Sometimes you just have to think practically.

You can see how nicely the circles turned out using the new circle cutter.  I also decided to ink my circles in a light blue tinge instead of the grey of the inspiration card (which I felt looked a bit dirty and I like my snow pristine looking).  For the background, I stamped a variety of snowflakes and then heat embossed them with a 'snowflake' powder, which is essentially a white with silver flecks mixed in.  I also popped a few clear rhinestones on for a bit of sparkle.
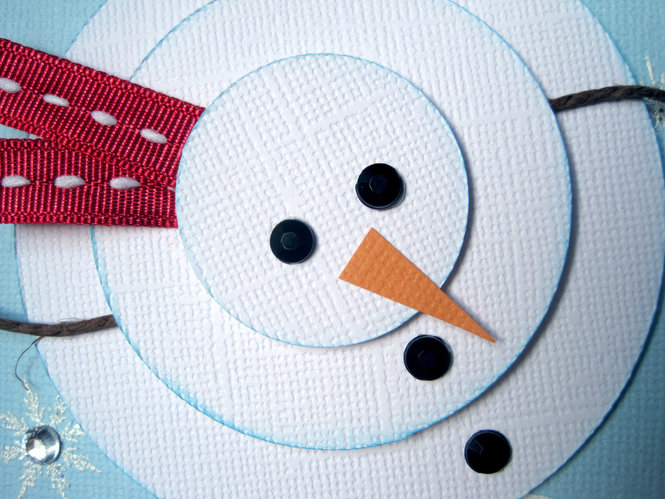
Detail view

A nice bright red ribbon made this little fellow's scarf but I had about five different ribbons that I used so there was a little variety to the set.  For the arms, I decided some dark brown twine would look suitably like branches and add another textural element, which I liked.  And I totally lucked out at the dollar store when I stumbled over massive sheets of colour self-adhering rhinestones, including black!  They were like perfect little chunks of charcoal just waiting for a snowman to adorn!  Serendipity, I tell you.

November 29, 2013

Hello 50 Birthday Card

So last week a friend at work turned the big 5-0.  Naturally a special card was in order.  I was excited to break into my new supplies and itching to use my new Pebbles From Me to You collection.  And since this was a special milestone card, gold was a must!


October Afternoon's Cakewalk papers mixed really well with the Pebbles collection so I dug out some scraps to use up.  I just love how cheerful these OA papers are (and to be honest, I've been hoarding that star paper for some time now).

I used the Pebbles sticker and chipboard accents to embellish.  I also wrapped some gold metallic sewing thread around the green banner - it's very thin and subtle but just the right weight to balance out the design.  And the chunky gold glitter Thickers are the Maggie Holmes variety by Crate Paper - I just love them!

Melanie absolutely loved the card, I'm pleased to say.  She gave me a huge hug and kiss and said it was the nicest card she's ever received.  Awww!  Isn't it wonderful to give someone the perfect gift?  Totally made my day.  Heck, it made my week.

November 15, 2013

Birthday Candles Card

I needed to whip up a quick birthday card to go with my friend's Barcelona mini album gift.  I'd been wanting to scraplift this cute card for a while now:


And here's my version:


Instead of rolling paper, I cut down some patterned paper straws.  I also topped each of my candles with little paper flames (I used a small heart punch and then cut them in two down the center).  I played with a lot of gold on this card - clear and gold striped washi tape, gold sequins, gold polka dot Thickers and the twine is cream with metallic gold thread.  Simple and clean and very well-received.

I also was finally able to give my friend her new Barcelona mini album - she was so surprised and bowled over; it was grand!  We took a photo of us together with it but it's on her phone and she hasn't shared it yet or I would include it here.  I so love being able to give someone the perfect gift, especially when it's handmade and from the heart.

October 20, 2013

Pinspiration Sunday

Welcome back for another weekly installment of online inspiration.  Go grab your hot beverage of choice and we'll dive straight in.

Currently:

* listening - to the radio
* reading - Papercraft Inspirations, October issue (I think...)
* making - class photo layouts
* eating - fresh mango, Special K with banana and blueberries, toast & peanut butter
* drinking - OJ
* wearing - jeans, angora & sequins jumper
* weather - mostly rainy, some fog, 11C
* feeling - tired
* wanting - the slightly lingering headache from yesterday to finally go away
* needing - to go grocery shopping (but probably won't...)
* planning - autumn break in Stockholm next week
* thinking - how nice it will be to finally be done with showering and toilet runs to the cellar
* loving - having running water in my flat again!!!
* enjoying - going to opera today to see Miss Siagon

And now on to the pins.

As a cat-lover, I thought this free quilt pattern was quite cute.  The whiskers remind me of chopsticks and gives it an Asian feel (I think).  Simple but effective.

I really liked this modern take on the half square triangle quilt.  I might have a go with this once I'm finished my slab quilt, which I've been itching to continue.

I don't know about you, but I keep all sorts of odds and ends - you just never know when you might need a small piece of something.  Or at least that's what I tell myself.  Get those small pieces of batting you've saved to go to work for you by joining them up on your next project.

How beautiful is this pieced postage stamp heart card?  I love how it uses a quilting technique and real postage stamps.  So simple but a great impact.  Anyone other than me also save postage stamps from letters?

Make your own funny monster dolls.  The faces could be machine or hand stitched or you could applique felt faces.  Simple shapes and bright colours work great together for a quick and easy day project.

OMG, I'm in love!  You have to understand, I have a serious pumpkin and gourd fetish around this time of year and I also have an owl obsession so this is pretty much a match made in heaven!  The sunflower details completely seal the deal.

I really loved the autumnal hues in this rose colour palette, especially when combined with the charcoal grey.

That's it for this week!  Pinspiration Sunday will be taking a break next week, as I will be on holiday in Stockholm going sight-seeing and relaxing - essentially, making more memories to scrapbook.  :)

September 08, 2013

Pinspiration Sunday

Wow!  I've had such a productive day today!  Always feels awesome, especially when I wondered this morning how I would possibly do it all.  So, I'm going to keep the ball rolling here on the blog, too, so go grab your hot beverage of choice and join me.

Currently:

* watching - Kitchen Nightmares
* eating - noodle stirfry
* drinking - water
* wearing - jeans, tank top, cardi, socks
* weather - windy & clouding over, 19C
* feeling - accomplished
* wanting - one more weekend day
* needing - to say goodbye to Oskar until the weekend :(
* planning - tomorrow morning before the construction workers come
* enjoying - a day spent scrapbooking

So let's get started!

I love this little, short, pocketed apron.  It would be perfect for crafting, to tuck pens or other small tools or items to hand.

I love handbags but I hate having to move everything from one to another.  Yet despite that, I still don't own a handbag organiser to quickly and easily swap bags.  This particular pin links to a purchase page (item currently out of stock) but it's actually the DIY idea of the item that I find inspiring, not that I would buy this particular item myself.
 
There is something about poppies that I find enchanting and I love the 3-dimensional quality of these embroidered ones.

I've received a lot of lovely comments on my use of Crate Paper slide frames in my recent LO, In an Octopus' Garden, so here's some more slide frame inspiration to pass around.  I love that they're paired with a great photo enlargement, which by now you probably know I enjoy using.
 
I love the simplicity of this fun and cute card.  Not that I send Hallowe'en cards (it's really not celebrated in Sweden, although somewhat more these days than the 11 years ago when I moved over) but it's still a fun card.

Today while scrapbooking, I broke into my new 2Peas star-shaped paper clips and I have to admit, they are super fun to use!  Webster's Pages is releasing a wide variety of shaped clips, from these cute hearts and funky arrows to autumn apples, holiday reindeer and golden crowns.  These are must haves for sure!
 
This is a simple but fun idea, especially for left-over photos that you don't plan to scrapbook or otherwise use but perhaps you don't want to bin them, either.
 
I spent time today breaking into my new Carta Bella Hello Again collection and really enjoyed mixing the soft pinks, melon peaches and black accents together.  When I saw this colour palette, it reminded me of those papers mixed together.

July 20, 2013

Whale of a Birthday

I needed to make a birthday card for my step-father so yesterday I set to work on it.  I knew I wanted to use some wood veneer numbers I'd recently bought but was struggling on which papers to use.  Long story short, I (finally) decided on the FP Down by the Shore collection.  I've been wanting to experiment with the new corrugated cardstock and the maritime portion of the collection has an especially nice masculine feel to it.  Prepare yourself for extreme cuteness - no, seriously, this chubby little whale gets me every time:


Isn't he *adorable*?!  My initial inspiration actually came from the central pennant, where you can see I layered up the wood veneer numbers (my step-father's age) and like I said, I just can't resist that whale and thought he'd be cute layered over the pennant, too.
 
For the corrugated cardstock, I simply stitched it with my sewing machine - the pressure from the presser foot did flatten the area I'd sewn but I also went over it twice so...  If you want to sew your corrugated cardstock and want to prevent it from flattening, I would recommend seeing if your machine has the ability to adjust the height/pressure of your presser foot (check the manual if you don't know this yourself).

I felt more pennants would help support the design and decided to use the anchors, since that's one of the challenge prompts in the current Stash Busters Challenges over on the 2Peas forum.  Then I fussy cut the whale and cut reverse scallops into the striped paper to help ground everything.  Lastly, I wrapped some twine around from which the pennants could hang and tied little knots in the ends.  I wasn't going to add a sentiment to the front but the 'happy happy day' sticker fit so nicely and I really liked how the pennants helped to lead the eye to it.

And yes, if you look closely in the above photo, that *is* lobster/crayfish fabric under the card.  :P

And just because I truly can't resist, I'll leave you with this:


June 26, 2013

WIP Wednesday

I can't believe it's Wednesday again already!  Things have been progressing with my Ricky Tim's Harmonic Convergence wall hanging.  I still have the top border to sew back on - something's gone wonky with the measurements so it's been giving me a spot of trouble but I'm sure I can work it out.  I'm taking a bit of a break from that right now and yesterday I picked up some new supplies for a few smaller projects that I've been meaning to do for a long time now.  I'm hoping to start them sometime later this week.


I thought I'd also share a WIP my quilt guild is working on.  Last year we decided that we should make a whole guild quilt where every member contributes a block.  Our Danish sister guild has done this and it's really neat to see everyone's interpretation of a theme.  Our theme was Mitt Skåne ("My Skåne"; Skåne being the province in which we live).

At first I wasn't sure what to do and then I found this great poppy fabric that kick-started my imagination.  You see, wild poppies aren't something I grew up with in my area of southern Ontario but they're everywhere over here in summer - through all the fields and in all the ditches along the roadsides in the country, so for me they're very European.

I decided that I wanted my block to be 3-dimensional; something that I'd never tried before.  I started with sewing some pale green scraps together in narrow stripes to mimic the tall, dried summer grass that often surrounds wild poppies.  Then I set about embroidering on some stem work, fussy cutting flower heads and stitching tiny seed beads - many, many seed beads - and came up with this:


Recently the committee responsible for this project at guild posted an update on how joining all of the blocks is coming along.  It's been decided that instead of making one enormous quilt, we'll make three or four smaller ones that will be more manageable.  And here is an update photo that includes my block (second row from the top, last block on the right):


I think only one other person used poppies in her block so I was pretty original.  Willow trees, bicycles, rape seed fields, white geese and The Little Mermaid statue (technically in Copenhagen) were all very popular motifs among the blocks.  It's going to be such fun to see when they're all finished!

I also whipped up a quick birthday card today for my uncle.  I had planned on making some candles out of paper straws but all the shops were out of them yesterday so I just decided to use my current go-to birthday card design.  It's always handy to have a design that you know you can easily fall back on when you're feeling rushed or tired or a birthday sneaks up on you unawares.


This stamp set is by Technique Tuesday and I use it regularly.  It includes a variety of sentiments, as well (birthday, anniversary, good luck, get well soon) so it's quite flexible and you can mix and match as you want.  I use mine with heat embossing powders so that it really stands out on my papers.  The 2Peas store no longer carries this stamp set but you might still find it elsewhere if you look around.

So what you are currently working on?

Reviewing May LOAD

So last month I challenged myself to do a 'layout a day' (LOAD).  It took me a little longer than I had initially planned to wrap up those last few layouts but I kept out all the pages I had made and earlier this week I sorted through all of them and decided that I would share before filing them away into their albums.  Today's video will give you a little tour of those creations.


I also sat down and put together the new job card for a friend that I've been mulling over in my head the last few days.  Inspiration for this card initially came from the July issue of Papercraft Inspirations, where they feature a new job card using a paper pieced clipboard.  I've taken the clipboard idea and made it my own.


The clipboard is made from a scrap of kraft cardstock that I rounded the corners of and then grunged up with sandpaper and distress ink.  I've done some random stamping with a date roller to mimic a well-used clipboard, added some ruler washi tape and since I didn't have a little bull dog clip, paper pieced one with an eyelet that I painted silver.

While I was sifting through my scraps I stumbled upon some old Graphic 45 school primer paper I had forgotten I had (an 8x8 pad someone sent me in a swap).  The handwriting paper was perfect to layer onto the clipboard and a polka dot paper covered the card front.  I wanted to keep the overall design reasonably simple so as not to detract from the cute theme paper but it was a little too monochromatic at this point so I added the red washi tape, letters and star.  The kraft tag added a horizontal element and then I balanced out the left side with a stamp.

Now I just need to get a birthday card for my uncle made...

June 23, 2013

Pinspiration Sunday

It's Sunday today and that means a little reflection on the things that have been inspiring me this last week so go grab a cup of your favourite hot beverage and cozy up for some photo love...

Currently:
  • listening - Mix Megapol radio station, Sunday countdown
  • making - new job congratulations card for a friend
  • wearing - PJs
  • weather - overcast, 16C
  • feeling - hungry
  • wanting - The Sims 3 Island Paradise EP to release sooner (Jun. 27)
  • planning - to cycle to West Harbour tonight to take photos of the 'super moon' (if weather co-operates)
  • loving - spending all morning curled up in bed with my laptop

Cindy has a great blog with stunning modern quilt and sewing designs.  I stumbled across her last week and she's a quilter after my own design style (but much more productive than I).  If you love sewing, go check her out: Hyacinth Quilt Designs.

Also from Hyacinth Quilt Designs, I totally fell in love with this unique quilt block design.  I think it would be beautiful in rich autumnal colours and made into Thanksgiving placemats - I'm thinking just a single feather on the left side and white space with some wavy quilting lines on the right.  I think I need to make a set of those both for myself and as a Christmas gift for my mum.  A matching table runner would be lovely, too, but I think I would set the feathers side-by-side is opposite directions.  You can download the pattern for free: Feather Bed Quilt Pattern.

Simply Sweet fabric line by Lori Whitlock for EP by Riley Blake Designs.  I love that more and more paper manufacturing companies are converting their designs into fabric (EP, MME, Bella Blvd just to name a few) and I love pretty much everything Lori Whitlock designs so this line is making me swoon right now!  It comes in three colourways (blue, pink and white).  Source: The Little Fabric Shop.

Also by Riley Blake Designs are these awesome large polka dot ombre fabrics in a rainbow of colours!  How fun are these!  I bet they would make super cool quilt/runner/wall hanging backings or borders.  Even chopping them up and using them in block designs would be cool, since you'd get a range of tints and shades throughout the project.  Source: The Little Fabric Shop.

From Christa Paustenbaugh's blog.  I'm absolutely loving how she cut up her photo for this cool "shutter shades" effect.  In fact, I love it even more because the reason she cut it up was due to lines her printer had made on the photo - most of us would have just binned it but she made it work!  I must try something like this.

From June Stricker's blog.  I like how June's thought outside of the box here and changed up her card shape - if you tilt your head to the right, you see a diamond shape.  I'm tucking away this idea for any future engagement cards I may need to make.  I also really like how she layered up papers and washi tapes.

From the new Carta Bella Hello Again collection, set to release mid-July.  I'm absolutely head-over-heels for this paper and if I buy nothing else from the collection, I just might add 10 copies of this paper to my cart!

Pear Brights - I have a new LO gelling in my head that uses this colour palette but think I might have to first re-print one of the photos first.

Enjoy your Sunday!

June 20, 2013

June Haul - A Video Experiment

So today I decided to take on a little experimental video project - that's right, I played around at making my first ever video.  It's nothing special or ground shattering; it's pretty much just a run of the mill haul video (boy, am I selling this to you or what?).  There is a little back story or two behind it, though, so perhaps that will help to perk your interest and if nothing else, I would love to get some feedback on how I did and suggestions for improvements.  It's been a real learning curve, figuring out how to best set up my tripod for shooting, dealing with a dead camera battery and subsequently editing/merging the two videos together, the long saving and long uploading process...  But here it is!


Okay, so time for a little self-reflection.  I think I babbled too much and really shouldn't have gone through all the papers to the extent that I did.  I also need to remember to keep the products on the table or just barely above them so they fit into the shot and don't blur.  I should also probably close the window to avoid the train noise but today was just too hot to do that.

I also promised in the video that I would link up some of my work I referenced.  Here are my two recent projects featuring the MME Oxford Land papers I've been using.


I'd also like to take a moment to give a hearty note of thanks to Shimelle Laine for her very generous NSD challenges and prize opportunities.  Last month I took part in many of her challenges and I was thrilled to be randomly selected as the winner for the Scrap About Yourself challenge with this LO:


Earlier in the week I received an email from Shimelle about the prize - free entry into not just one but two of her upcoming online classes!  The first is her already announced Masterclass on layering - sounds perfect for me; I like to layer!  The second is a yet to be announced online class through her website - no title yet but I'll keep the details she mentioned to myself right now, as I'm not sure how much she wants revealed at this point but it sounds awesome!  It was the perfect start to my summer holidays, since I'd been planning to take another of her classes.  I'm super stoked and can't wait to start!  I just hope they open up now over the summer so I can really focus on them.  Thanks again, Shimelle!

And finally, I'll share some photo love from my quilt guild's recent trip around Småland last Sunday.  We began by driving up to a jam-packed little shop just outside of Perstorp (in the woods).


As you can see, many lovely creations on display.  I bought a handbag pattern and a set of Marmalade candy pre-cuts to use with it and also three FQs in black, white and a silvery grey for a penguin doll we'll be making for guild.
Next we drove foreeevvverrrrr (or so it seemed) to a golf club for lunch (scrummy food, definitely worth it) and then headed off to the Sprätthonsen quilt exhibition, held is this truly beautiful old barn.  A few of my favourite photos:


Finally, we visited Tyger & Ting quilt shop, where they also had a number of samples on display but I particularly love their back porch display:


I was reasonably well-behaved and 'only' bought two charm packs and a tulip table runner pattern (yes, I know I still haven't made the tulip runner I bought from them last year but this one is different...).  They also threw in a free partial pattern for a runner adaptation of Garden Fence, which is how I stumbled across Cindy's great blog, Hyacinth Quilt Designs (check the links list to the right) - a girl after my own heart and such a great name, too!  Here's the photos of my 'hauls' from this day:


I'm thinking that I might use the Aspen Frost charm pack for the Garden Fence runner and if I start it over the summer, I might actually have it done by the time the holidays roll around (or not)!

June 19, 2013

WIP Wednesday

I feel like there's a lot I want to share recently but I'm going to break things down and not flood the blog all at once.  Right now this is what I'm enjoying most:


Now that summer holidays have officially arrived, it's 100% craft and "me" time - swoon!  Since I don't have an extra bedroom to use as a craft space, I like to set up my sewing machine out on the balcony when the weather is nice.  There is something particularly lovely about stitching outside with the sunshine and a light breeze, watching the trains go by (just behind the fence in the distance).

My current WIP (work in progress) is a Ricky Tims Harmonic Convergence wall hanging.  I made the top about two years ago during a sewing project day with friends but I was never happy with the inner border - it was decidedly blue and didn't really go well with the rest of the colour palette.  Then one day at quilt guild, a vendor had this fabric that I snatched up:


Isn't it just yummy?  And scrapbookers, look carefully - yes, that is a MME fabric!  I'm in total love.  So a few months ago I ripped off all the borders with the plan to replace the inner blue border with this lovely turquoise one but never got that far.  Yesterday I sat down and began the process of adding the borders back on and it's looking so much better now.  The top border is giving me some issues, however.  Despite everything being squared up properly, the border and cornerstones aren't matching up well but I'm sure I'll get there in the end.

Here's a general layout view for you (along with Oskar, who is 'snooper-vising'):


You can see that I've made the borders directional so that the cups look like they're hanging.  The folded fabric in the top left will be the backing fabric.  I haven't decided on the binding yet - probably either that luscious turquoise or the brown.  I may also fussy cut and applique one of the teapots onto the design, too, but that's still being debated at the moment.  For quilting, I'm thinking swirls to mimic steam throughout the body and possibly waves along the borders and maybe concentric circles in the cornerstones.  My machine doesn't quilt well, though, so this might end up being a hand quilt project...

Next up, I sat down today and made a belated Father's Day card for my step-father.  With all the bustle and stress of end of school work, Father's Day just sort of hit me out of the blue.  I was a good girl and made a point of ringing him up but thought I should send along a card, too.


A lot of my inspiration for this card came from working with the MME Oxford Lane papers when putting together my Gaelic Girls LO - the colours are of course masculine and a wee bit retro and I liked how well they paired with both the Maggie Holmes gold glitter Thickers and the Webster's Pages Composition & Colour neon yellow washi tape (seriously, if you love Oxford Lane, invest in this tape, too - they are the perfect match in both colour and style).

I also had some inspiration from this week's Stash Busters Challenge at 2Peas, specifically prompt #1 (use something shiny) and prompt #2 (use something natural).  I recently found these lovely kraft corrugated die-cuts at my LSS and decided to try them out and I knew I wanted to use one on this card.  The MME papers are all white-based, however, so I decided to pull in a little more kraft with the matting and I made a border of the yellow washi tape to remove some of the over-powering white and help draw out a little more pop of yellow in the process.  The button is made of coconut wood and sort of reminded me of a suit button, which would compliment the necktie.  I think the few sequins and the glitter Thickers are just enough bling without going overboard and still works well together with the kraft elements.  If you'd like links to this project's shopping list, you can check it out here: #1 Dad card.

That about wraps it up for today.  What are your current WIP?