Hi, folks!
It's been very quiet on the blog front lately due to my crazy busy schedule and new-found ability to sleep while standing up, or so it would seem most days. However, I will be on holiday from this week through to the New Year and look forward to catching up with all of you then.
Wishing everyone a magical, safe and happy holiday season!
Cindy
December 15, 2014

December 01, 2014
Getting Into the Season
Happy December!
Every year in November leading up to the Christmas season, my friends and I take an annual floral arranging course at the local and much renowned floral college, Ingvar Strandh. We've been going there for years and they always have new projects, from wreaths to decorated candles to hanging arrangements and more. It's always fun when you can go to these sorts of events and walk away with finished projects and they always look quite professional.
This year we took a half day course and did two projects (although not nearly as impressive as previous years): a decorated hyacinth bulb and a wreath, which also included a cute little handmade wire heart decoration.

Here's my little hyacinth with the bulb wrapped in fresh moss. It's decorated with some lichen, dried apple slices and a little twig with red berries (can't remember the English or Swedish name for them).

And my finished wreath made from spruce boughs. It's decorated with fresh moss balls and lichen, tiny fresh apples and dried apple slices, a small succulent plant and a handmade wire heart with berries and bow. The smell is simply gorgeous! And while this may look impressive, it's actually crazy easy when you have the supplies.

All finished! I decided instead of hanging the wreath on a door where I wouldn't get to enjoy it so much to instead use it as a centre piece on my coffee table with a huge pillar candle (also made at the floral college a few years ago). Now I get to see and smell its beauty every day.
Every year in November leading up to the Christmas season, my friends and I take an annual floral arranging course at the local and much renowned floral college, Ingvar Strandh. We've been going there for years and they always have new projects, from wreaths to decorated candles to hanging arrangements and more. It's always fun when you can go to these sorts of events and walk away with finished projects and they always look quite professional.
This year we took a half day course and did two projects (although not nearly as impressive as previous years): a decorated hyacinth bulb and a wreath, which also included a cute little handmade wire heart decoration.
Here's my little hyacinth with the bulb wrapped in fresh moss. It's decorated with some lichen, dried apple slices and a little twig with red berries (can't remember the English or Swedish name for them).
And my finished wreath made from spruce boughs. It's decorated with fresh moss balls and lichen, tiny fresh apples and dried apple slices, a small succulent plant and a handmade wire heart with berries and bow. The smell is simply gorgeous! And while this may look impressive, it's actually crazy easy when you have the supplies.
All finished! I decided instead of hanging the wreath on a door where I wouldn't get to enjoy it so much to instead use it as a centre piece on my coffee table with a huge pillar candle (also made at the floral college a few years ago). Now I get to see and smell its beauty every day.
November 29, 2014
Little One...Hello
Earlier this month friends of mine had a baby boy. Naturally this meant that a baby card was in order. I got to work straight away and in very little time came up with this (if I do say so myself - and I do) adorable card.

Now, would you believe that this card was entirely made from supplies from the Project Life baby girl kit? Yes, indeed. Everyone I know recently has been having baby girls and so my stash of baby related papercrafting is overloaded with pink, frilly cuteness. And then suddenly a baby boy. Well, I was up to the challenge.
I started shifting through the Project Life cards, looking for any non-pink possibilities. Now, don't get me wrong, I see no problem in little boys having pink things and dolls and I certainly see nothing wrong with little girls having blue things and playing with Tonka Trunks but it's probably safest to play the gender neutral card in these situations. So...I went with the fab retro orange and brown combination.
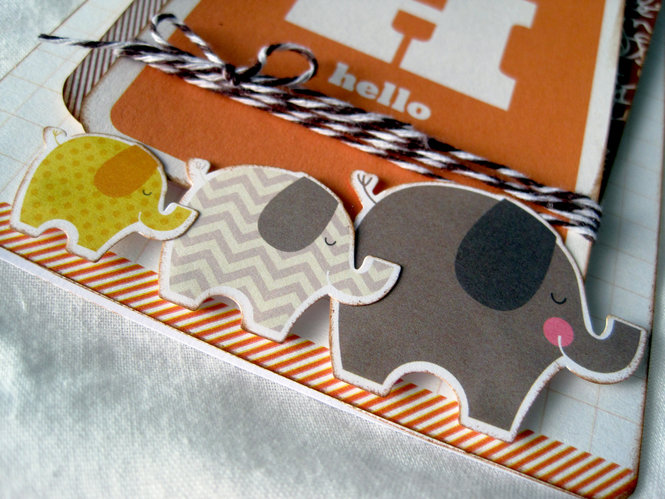
The elephants, stars and moon are from the Simple Stories baby girl collection kit and aren't they just the cutest? I piled the elephants up on the bottom in a little family train.

Having added the elephants, there was suddenly this yellow from the baby elephant that was out of sync with the rest of the design and colour palette so I searched the Simple Stories sticker sheet for a way to bring more yellow into the card. I found the moon and added some stars to make a visual triangle. The cork cloud was a nice way of anchoring the stars and adding another texture and dimension of brown at the same time.
Finally - and I didn't take a photo of this part - I added the sentiment inside. And to my horror, as I was writing out my note to my friends, I misspelt one of the words! No! What to do, what to do? I grabbed for a package of word stickers and found a selection that not only fit with the message but even worked with the colour scheme and completely covered up my faux pas - whew!
Now, would you believe that this card was entirely made from supplies from the Project Life baby girl kit? Yes, indeed. Everyone I know recently has been having baby girls and so my stash of baby related papercrafting is overloaded with pink, frilly cuteness. And then suddenly a baby boy. Well, I was up to the challenge.
I started shifting through the Project Life cards, looking for any non-pink possibilities. Now, don't get me wrong, I see no problem in little boys having pink things and dolls and I certainly see nothing wrong with little girls having blue things and playing with Tonka Trunks but it's probably safest to play the gender neutral card in these situations. So...I went with the fab retro orange and brown combination.
The elephants, stars and moon are from the Simple Stories baby girl collection kit and aren't they just the cutest? I piled the elephants up on the bottom in a little family train.
Having added the elephants, there was suddenly this yellow from the baby elephant that was out of sync with the rest of the design and colour palette so I searched the Simple Stories sticker sheet for a way to bring more yellow into the card. I found the moon and added some stars to make a visual triangle. The cork cloud was a nice way of anchoring the stars and adding another texture and dimension of brown at the same time.
Finally - and I didn't take a photo of this part - I added the sentiment inside. And to my horror, as I was writing out my note to my friends, I misspelt one of the words! No! What to do, what to do? I grabbed for a package of word stickers and found a selection that not only fit with the message but even worked with the colour scheme and completely covered up my faux pas - whew!
November 26, 2014
WIP Wednesday
Hello, hello!
Wow, is it seriously Wednesday again already? Amazingly, I got some extra stitching done over the weekend and that means more progress on my Nice People, Nice Things embroidery quilt.

It's shaping up nicely.
Linking up to Freshly Pieced:

Wow, is it seriously Wednesday again already? Amazingly, I got some extra stitching done over the weekend and that means more progress on my Nice People, Nice Things embroidery quilt.
It's shaping up nicely.
Linking up to Freshly Pieced:
November 24, 2014
Wish Patchwork Birthday Card
Hi, there!
Last month I made up a set of patchwork thank you cards and decided as my mum has been a professional quilter, it would only be fitting to make a similar patchwork card for her birthday this year. As I still had many tiny little triangles left over from the first batch of cards, it was a very quick and easy make.
Like the original set, I used a small doily and a die-cut, this time scalloped, and a sprinkling of gold sequins. I also added some of the pink thread I used for the stitching between the doily and the die-cut. I had intended on layering up some other elements but I didn't want to detract from the patchwork background so I decided to just keep it simple.
And thankfully, while this card won't make it to her on or before her birthday, it won't be months late like her Mother's Day card was - whew!
Last month I made up a set of patchwork thank you cards and decided as my mum has been a professional quilter, it would only be fitting to make a similar patchwork card for her birthday this year. As I still had many tiny little triangles left over from the first batch of cards, it was a very quick and easy make.
 |
| Wish Patchwork Birthday |
Like the original set, I used a small doily and a die-cut, this time scalloped, and a sprinkling of gold sequins. I also added some of the pink thread I used for the stitching between the doily and the die-cut. I had intended on layering up some other elements but I didn't want to detract from the patchwork background so I decided to just keep it simple.
And thankfully, while this card won't make it to her on or before her birthday, it won't be months late like her Mother's Day card was - whew!
November 21, 2014
Kiva Update - Andres in Mexico
I received another update from Kiva on one of my loan investments - I'm really loving this feature and being able to keep updated on the progress of lenders.
Andres in Mexico received a loan to start his own cucumber plantation business and he's well under way. Here's his update:
 Reposted email from Kiva:
Andres in Mexico received a loan to start his own cucumber plantation business and he's well under way. Here's his update:
With the loan Andrés got from Kiva, he rented a
3,000 meter greenhouse in Yecapixtla, Morelos and planted 8,000 organic
cucumber seeds.
Andrés can here from become a partner of Truequio’s cooperative and sell his cucumber production for exportation at a better price.
 He is very enthusiastic about his work and the influence that young producers like him can have within his community to avoid migration and unemployment.
Andrés has also been an example to encourage other producers to request a loan and increase their production.
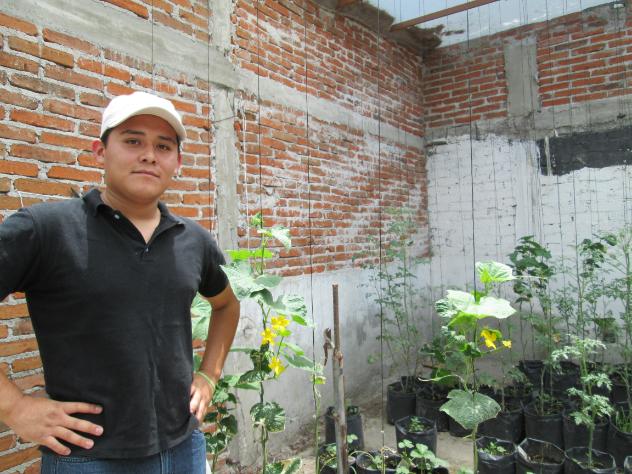
The picture shows Andres´ cucumber production in process.
Andrés can here from become a partner of Truequio’s cooperative and sell his cucumber production for exportation at a better price.
He is very enthusiastic about his work and the influence that young producers like him can have within his community to avoid migration and unemployment.Andrés has also been an example to encourage other producers to request a loan and increase their production.
The picture shows Andres´ cucumber production in process.
***
Want to get involved with Kiva, too? Join Kiva today!
November 19, 2014
WIP Wednesday
Hello, hello!
Just a short post to share with you today my most recent progress on my Nice People, Nice Things embroidery quilt. I really like the simple elegance of this block.

Linking up to Freshly Pieced:
Until next time...
Just a short post to share with you today my most recent progress on my Nice People, Nice Things embroidery quilt. I really like the simple elegance of this block.
Linking up to Freshly Pieced:
Until next time...
November 17, 2014
Celebration Tea Bag Pinwheel
Welcome back!
Recently I decided to try a new technique. I was reading through a back-logged issue of Papercraft Inspirations and came across a Masterclass article for tea bag folding and thought I'd give it a whirl - if you like origami (and I do), then tea bag folding is just the thing for you, too.
As with origami, using a thin paper is helpful with the folding and obtaining crisp edges so I dug out some of the free 6x6" paper gifts from Papercraft Inspirations (as these are always thin quality paper) and got started making my pinwheel. It was super quick and easy, although it turned out larger than I had anticipated. I decided to mount it on a regular A6 card blank anyway, rather than a square, to give it some interest and really make it the focus of the card. Similarly, I used a layer of vellum to diffuse the background pattern so it wasn't so overwhelming.

I dressed up the center of the pinwheel with a swirl of twine and two layered buttons, then sprinkled some pink/purple sequins around like a sparkling fireworks display, ran another length of twine along the fold and stamped a very simple sentiment onto the pinwheel itself.
This little message of cheer will be going to a colleague who is celebrating her 25th birthday and I hope it will put a sparkle in her eye.
Recently I decided to try a new technique. I was reading through a back-logged issue of Papercraft Inspirations and came across a Masterclass article for tea bag folding and thought I'd give it a whirl - if you like origami (and I do), then tea bag folding is just the thing for you, too.
 |
| Celebrate Pinwheel |
As with origami, using a thin paper is helpful with the folding and obtaining crisp edges so I dug out some of the free 6x6" paper gifts from Papercraft Inspirations (as these are always thin quality paper) and got started making my pinwheel. It was super quick and easy, although it turned out larger than I had anticipated. I decided to mount it on a regular A6 card blank anyway, rather than a square, to give it some interest and really make it the focus of the card. Similarly, I used a layer of vellum to diffuse the background pattern so it wasn't so overwhelming.
I dressed up the center of the pinwheel with a swirl of twine and two layered buttons, then sprinkled some pink/purple sequins around like a sparkling fireworks display, ran another length of twine along the fold and stamped a very simple sentiment onto the pinwheel itself.
This little message of cheer will be going to a colleague who is celebrating her 25th birthday and I hope it will put a sparkle in her eye.
November 15, 2014
A Cowl for Granny
Hello, hello!
Recently I made this cowl and really loved the whole crocheting process and how the final project turned out - quick, easy and a beautiful result. I mean, what could be better? So I decided I should make a few for Christmas gifts.
There's this wool shop near my work that I've always been meaning to go into and look around. Unfortunately, as I work ridiculously late into the evening most nights, they're never open when I pass by. However, I finally found some time to pop in and I found this super yummy wool calling out to me:

I don't know what it is with variegated anything but I love it! And this pink/orange/purple combination was just too gorgeous to not go home with me. And they even sell those chunky plastic buttons I adore so I scooped up a paisley-shaped purple one to go with it.
A weekend later and this was the result:

OMG, I'm totally in love! I'm definitely going to need to go back and buy more of that same wool because I seriously need a second cowl like this just for myself.

And this time I made sure the wool was a uniform consistency, which really helped with the ease of crocheting and knowing I was using the correct loops and counting accurately. I also like how you can see the stitch pattern with this one; it adds to the visual interest.
So there's a little Christmas gift for Granny done. Hope she likes it (or I just may roll her for it - ha!) You can also see the cowl I made for my mum for Christmas here.
Recently I made this cowl and really loved the whole crocheting process and how the final project turned out - quick, easy and a beautiful result. I mean, what could be better? So I decided I should make a few for Christmas gifts.
There's this wool shop near my work that I've always been meaning to go into and look around. Unfortunately, as I work ridiculously late into the evening most nights, they're never open when I pass by. However, I finally found some time to pop in and I found this super yummy wool calling out to me:
I don't know what it is with variegated anything but I love it! And this pink/orange/purple combination was just too gorgeous to not go home with me. And they even sell those chunky plastic buttons I adore so I scooped up a paisley-shaped purple one to go with it.
A weekend later and this was the result:
OMG, I'm totally in love! I'm definitely going to need to go back and buy more of that same wool because I seriously need a second cowl like this just for myself.
And this time I made sure the wool was a uniform consistency, which really helped with the ease of crocheting and knowing I was using the correct loops and counting accurately. I also like how you can see the stitch pattern with this one; it adds to the visual interest.
So there's a little Christmas gift for Granny done. Hope she likes it (or I just may roll her for it - ha!) You can also see the cowl I made for my mum for Christmas here.
November 10, 2014
Kiva Update - Carlos & Alonso in Mexico
Another lender update from Kiva! This time on Carlos and Alonso's recycling initiative. See how they're doing:
 Reposted email from Kiva:
Carlos and Alonso, the popular firemen from Chiapas, have
successfully started their community recycling program. They have
gathered some of the families in their community to launch the plastic
recollection and they are talking to local schools too!
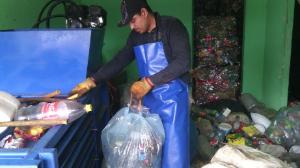 With their project they are reactivating engagement between the
members of their community as well as obtaining an extra income for
keeping the town clean.
With their project they are reactivating engagement between the
members of their community as well as obtaining an extra income for
keeping the town clean.
With their project they are reactivating engagement between the
members of their community as well as obtaining an extra income for
keeping the town clean.
***
Want to get involved with Kiva and helping inspiring people around the world? Join Kiva today!
Subscribe to:
Posts (Atom)