July 12, 2014

Vintage Bliss Cards

Welcome back!

In my last post I shared a new kit I made from my stash supplies, called 'Squeeze' - a collection of bright citrus oranges, yellows, lime greens and a few hot pinks with kraft and wood grain neutrals.

Now, despite having pulled this yummy new kit, I sort of went in a different direction with some very long over-due cards I've been putting off making.  While going through my stash, I pulled out this Simple Stories Vintage Bliss sticker sheet:

Vintage Bliss

I've barely touched it so far and decided it was high time I started using it so I grabbed some card bases and got to work and whipped up two cards.

The first card is a very belated Mother's Day card for my mum.  Originally I had started this card months ago - can't even remember what for now - but didn't get any further than adhering the patterned paper to the card base, then just couldn't seem to decide on a direction for it and set it aside.  Having been on a crafting hiatus for a while now, I decided to keep things a bit simple.

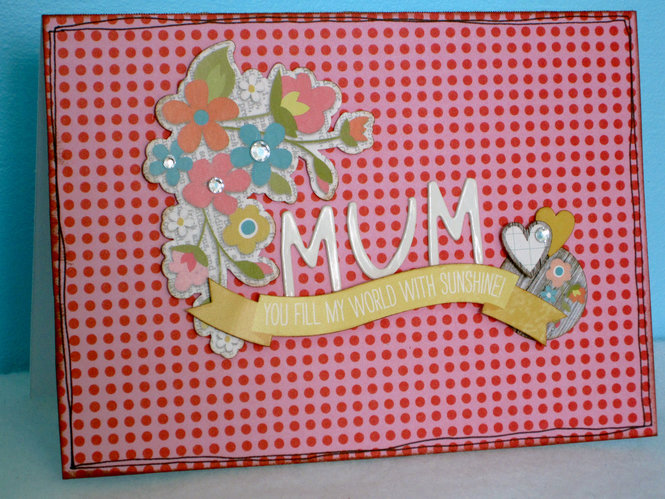
Mum - You Fill My World with Sunshine

Sometimes it's nice to have non-conventional sentiments, which is why I chose the banner.  I added the flowers and played with where to place them until I discovered how nicely the 'M' fit into a gap in them.  Then added the circle at the end of the banner and clustered a few little hearts there.  Finally, I added rhinestones to the centers of three of the flowers and then balanced those with a single rhinestone on the topmost heart.  As a finishing touch, I doodled some lines around the edges to ground the design.

Now, if you thought Mother's Day back in May was bad for being behind, you'll absolutely cringe when I tell you that this next card is an extremely belated birthday card for my Granny - whose birthday was in April!  Eek!  Bad granddaughter!  I know she won't have minded and she'll like getting a card regardless so I made one anyway.

So this second card combines the Vintage Bliss sticker sheet with some October Afternoon products - a journaling card, which I had thought to use on another project a while back, inked the edges and then changed my mind, and some mini market letter stickers.  I also threw in a MME label sticker.

Oh So Happy Birthday

I found the yellow gingham paper in my scrap basket, then noticed that the blue label would fit perfectly inside the journaling card (and that the colours worked well with the sticker sheet) but I decided to off-set the card and label for more visual interest and to keep a more playful feeling.  A little washi tape to ground the grouping, added the vase of flowers sticker and wrapped a bit of embroidery floss into a bow around it.  Layered on the phrase label sticker and the letter stickers for the sentiment and finished it off with a little tab and a cluster of flowers and rhinestones.  I really enjoyed working with the pink, orange and turquoise colour palette and I like how the gingham is reminiscent of a country table cloth with a vase of flowers centerpiece (or is that just me?)...

Now, just another seven more cards I'm behind on making left to go!

July 11, 2014

Squeeze Kit

Hello, hello!

Today I wanted to share a new FB group that I recently joined, hosted by Margareta Carlsson, a fellow former 2Pea; Scrap Stash Kit Club.  Margareta has long made kits out of her existing stash and shared them on the 2Peas boards and she made this group to help encourage other scrapbookers to do likewise.  It's a closed group but feel free to look into it if it sounds like something you'd also be interested in joining.

Anyway, while I enjoy using collection packs, I've never actually made a kit from my stash before.  Well, perhaps that's not entirely true; I guess I have on a small scale for one or two specific projects and usually using a collection pack to begin with and then adding embellishments, etc. from my stash.  Margareta challenged the group to make a 'Squeeze' kit for the summer using bright citrus yellows, oranges and lime greens - sounds right up my alley.  It really started to get my creative juices flowing again so I pulled together a kit...except that I'm not really very good at being selective so it's HUGE!

Okay, so here are the papers I pulled - a selection of lime greens, oranges, yellows, a couple hot pinks and then I added a handful of kraft and wood grain neutrals.

Patterned Papers

Then I pulled a selection of specialty papers, sticker sheets, letter stickers, chipboard, vellum, transparencies, etc.

Specialty Paper

And then embellishments...  Oh the embellishments...  The really small ones without packages I put into this cute little double plant pot with a handle.

Embellishments

Small, loose embellishments

Now I just need to add photos and get messy!  :)

July 10, 2014

WIP Thursday

I'm about ten and a half hours behind in sharing my WIP Wednesday with you but when I remembered it was Wednesday (evening), I realised I had forgotten to take photos of my current projects while the day light was still good and strong so decided to wait for decent(-ish) photos.  That's my story and I'm sticking to it!  So here we go:

I've been doing a bit more embroidery for my Nice People, Nice Things embroidery quilt.  I finished off the text for the back of the 'party time' block.

'Dance like nobody's watching - sing like nobody's there - love like there's heaven on earth'

And then I must have really jumped on the band wagon because I sat out on the balcony in the blissful sunshine one morning and stitched up the next picture block from start to finish!

Laughter

Now, I have an old friend from Canada arriving to visit me for two weeks on Sunday so not sure how much attention the blog will be getting while he's here.  I know what you're thinking - it's not been getting much attention already!  And you're correct but that's the beauty of summer holidays, isn't it?

Linking up to Freshly Pieced:

July 02, 2014

WIP Wednesday

Hi, folks!

Just a quick WIP Wednesday update for me today.  I got a little work done on the weekend on my current Nice People, Nice Things embroidery quilt.  I'm starting to run out of orange floss, though, so I'll have to make another shopping run soon.


I'm hoping that I can make a trip to the quilt shop soon to buy the correct white to continue work on my layer cake sampler quilt - I bought 3m of white about a month ago, started cutting into it when I got home and then realised it's not the same white I used for the rest of the quilt.  Le sigh.  Hopefully the white I need won't be sold out...

Linking up to Freshly Pieced:

July 01, 2014

Baby Bunting

Happy Canada Day!

I have a little sewing project I've recently been working on all finished to share with you today.  As you may have read, a close friend of mine had her baby last Sunday (three weeks early and on the baby shower date!).  Well, I had originally planned to make some baby bunting for the shower that could later be used to decorate the little one's room.  Probably a good thing that she came so early, because I was quite a bit behind in getting this project made - it just seemed to keep expanding and taking on a life of its own...

Baby Bunting

My original idea was to be a 'quick and dirty' make - an afternoon of crafting and done.  That's not exactly how it worked out.  I printed out the letters using Arial Black font, point around 80-90, I think, then cut them out and used them to trace out the Heat n'Bond.  I had thought to just stick the letters directly onto the striped pennants but then discovered there wasn't as much contrast between the two fabrics as I had originally thought.  So I had to make up some circles, which I backed with interfacing, onto which I put the letters.  I hand stitched the circles down using a blanket stitch and that alone took up a fair bit of time.

The pennant shape I made myself by simply folding some paper and deciding on an angle and size I liked.  Then I decided since the pennants had already become this involved, we might as well go the whole hog so I backed them onto some white cotton and stitched around the edges (1/4 inch in from the edge), then used pinking shears to finish the edges.

Finally I made some double-sided fabric strips, which I also pinked along the edges, and tacked each pennant along it using four sets of cross stitches (each triple stitched so it's good and solid).  All in all, a two-day project but totally cute and worth it!

Sagan börjar

The bunting reads 'Sagan börjar'.  It's a play on my goddaughter's Scandinavian name, Saga (so pretty - I've always loved that name).  Translated it means 'The saga begins.'

And a little close-up shot...


New mummy received these goodies today and was super thrilled with the idea.  My work here is done.