Showing posts with label mist. Show all posts

September 08, 2014

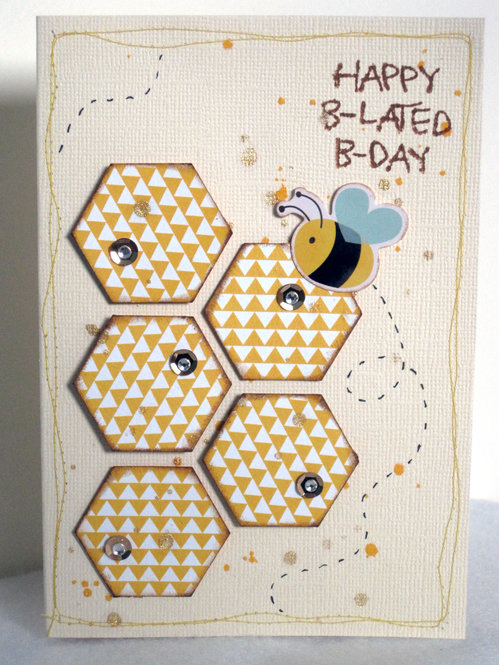
Happy B-Lated B-Day Card

Hello, hello!

I recently bought a fantastic new punch - Fiskars' large hexagon punch, which was the inspiration for this rather belated birthday card.  I knew I wanted to have some fun playing around with my new toy and naturally when one thinks of hexagons, one tends to think of honeycombs.  A little play on words with the bee theme and I was off!


I kept the background a simple cream with some mist and gold lame spatters and a machine stitched, wobbly border.  For the hexies I used a bold geometric print paper.  Next I stamped the sentiment directly onto the background and finally layered up my bee sticker plus some gold sequins and rhinestones to suggest glittering honey.  And of course the little bee needed some whimsical flight lines.

Oh, and I couldn't resist adding in a little 'Hope you had a 'sweet' birthday' in the sentiment.  ;)

August 31, 2013

In an Octopus' Garden

I've been working on getting back into a regular scrapping routine since having returned to work recently.  It's not been easy - especially the work; but we won't get into that.  But I do have another new LO to share with you today; this time returning to my Barcelona holiday photos.


I am totally in love with these CP retro slide frames.  Not only do they look great and are a great eye-catching feature on a page but I love just how quick and easy they can make a page come together.  I also especially like that these chipboards have a smooth texture, unlike many of the matte/pixelated chipboards used by many companies.

I started by blotting some blue and green spray mists onto my cardstock base, then sprinkled on more blue, green and some white mist and stamped some 'bubble' shapes around the page.  There was a dicey moment when my acrylic block somehow flew out of my hand and landed stamp-side down in the upper right-hand corner but I just rolled with it.


For the title, I reached into my basket of current supplies and just grabbed the first thing that called out to me - Amy Tan's vellum sticker alphas from Yes, Please.  I decided to mix things up and use the orange letters, since there were pops of orange in several of the photos and I liked the idea of using a complimentary colour palette.  I knew I also wanted to use this cute wave border strip so layered it up in the title along with the circular letter stickers and I really like the effect.


I took my time fussing cutting this little octopus from FP's Down by the Shore.  Got to use a new SC cork embellishment and added another pop of orange and some enamel dots.


I've had these adorable fish buttons for a while now, just waiting for the perfect project and when I saw the little fish paper in Down by the Shore, it inspired me to use them here (even though I didn't use that paper on the LO in the end).  A few white enamel dots add some textured air bubbles to each fish.


And I was so thrilled when I discovered that yes, I did have bright orange enamel dots and sprinkled a few in the topmost cluster, along with a piece of flair from a package I hadn't yet broken into.

To finish everything off, I decided to back the page up with some distressed orange watercolour paper, do a little machine sewing around two of the corners and really distress the inner border for some depth and interest.  I also think the distressed edge gives a little impression of an old 'message in a bottle' feeling.

July 15, 2013

Summer on the Horizon

I feel like I've sewn my brains out these last few days (not a bad thing, just saying) so I'm switching gears back to scrapbooking.  I've had one partially started layout sitting on my table for far too long for my liking and while I wanted to get it finished over the weekend, that didn't happen but today was the day - hurrah!

So for this layout I tried something different from what I normally do.  Using colour palette charts seems to be all the rage in scrapbooking lately and I do love the Design Seeds palettes so when I saw this one, I knew I had to use it - orange, yellow and turquoise - *happy place*...


I pulled entirely too much paper and 'stuff', which resulted in being overcome with choice - never a good thing for me.  I worked on whittling it down, thinking I knew what I wanted to make and in the end it went in a rather different direction - different but good.  Here's the final layout:


I made the sun burst from vellum, which I misted in a bright orange, then cut out the rays and stitched them down with my sewing machine.  For the sun itself, I painted a doily using the same orange mist.


For the water I layered up stripes of different turquoise papers in an ombre effect and tilted them here and there like moving waves.  Then I layered up some turquoise sewing thread over top for some texture and held it in place with pearls for 'sea spray'.


I kept the few embellishment clusters small because I really pushed myself to go into excess on the rest of the page - something that is hard for me to do but I really wanted that boldness and overpowering feeling of joy that a multitude of gold sequins gives (or is that just me?).  And that adorable butterfly shaped paper clip?  I found that at an art/stationery shop in Ystad the other week - sooo cute!

Lastly, I used this page to play around with some homemade texture paste (talcum powder, glue, paint and a bit of water) and I'm really pleased with how it turned out.  I cut my own triangle mask from some cereal box cardboard to use with it.  Easy peasy.


Feels good to get this project completed and I feel like I've stretched myself with some fun, new or different techniques.