Showing posts with label wallhanging. Show all posts

January 09, 2016

2015 Year in Review

Welcome back and Happy New Year!

For the first time ever, I feel I was productive enough with my sewing last year that I can justify writing an annual 'completed projects' post - yeah!  It's all thanks to my new-to-me sewing machine, my Janome 6600P.  So without further ado, here is a run down of last year's finished projects.

Dinosaur Baby Shower Gifts

Six Pocket Tote Bag

Baby Quilt - Group Sew

Tula Pink Handbag

Harmonic Convergence Wallhanging

Diamond Jubilee Jelly Roll Race Quilt

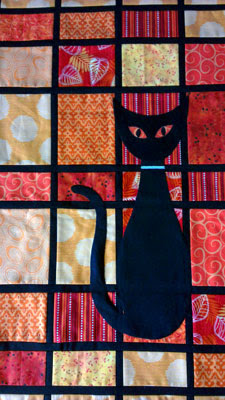
That Cat Wallhanging

So six completed solo projects, one completed group project, plus another three quilts/wallhangings very close to completion - that's a pretty tidy sum for a year by my record.  Stay tuned for a peak of what I hope to have in store for 2016, coming soon.

October 10, 2015

That Cat! Wallhanging

Hello and welcome back!

Today I'm thrilled to share with you my most recently finished project - my That Cat wallhanging (pattern featured in McCall's Quick Quilts).


This project went together so quickly and easily, even despite the half inch wide black grid requiring precis piecing.  It's very striking (please ignore the hideous wallpaper from the previous owners) and I love the rich oranges - it makes me happy every time I look at it.

I put my own little twist on the project with the cat's collar.  In the original project, it's an orange fabric strip but I decided I wanted something a bit more witch-y so I used a metallic silver ribbon and then sewed on a silver and rhinestone star-shaped pendant for a little sparkle and bling.

I shared this project recently at my guild's show and tell and it was very popular and well received.  I've sent a photo off to McCall's Quick Quilts and fingers crossed it might be featured in a future magazine - we'll see.

September 30, 2015

WIP Wednesday

Hello, hello!

Whew!  What a busy few weeks.  I meant to share my latest updates on my That Cat wallhanging last week but it was simply not meant to be.  However, despite the busy work and life events, I have been managing to fit in a sewing day most Sundays, which has been blissful to resetting that work/life balance.

Nearing the end now, I finally have all of the quilting done.  I straight stitch quilted around each of the orange boxes and around the cat.  I also straight stitch quilted in the borders with a 1/4 inch spacing, like in the original featured in the magazine.

Please excuse the cat hair (ironic, right?)

On to the binding - my favourite part!  So looking forward to seeing this project done!


Linking up to Freshly Pieced:

September 09, 2015

WIP Wednesday

Welcome back!

I've been making progress on my That Cat wallhanging this week.  The applique is on and has been stitched down and it's been sandwiched and basted, ready for quilting.


I decided to swap out the fabric fused collar for a silver metallic ribbon (which is showing up a weird blue in the photo) and once finished, I'm going to sew on a little Hallowe'en-themed silver charm.

Linking up to Freshly Pieced:


September 02, 2015

WIP Wednesday

Hello, hello!

Whew!  School is back in full swing (and I have an awesome class this year, might I add) but I've been finding a bit of time here and there to squeak in a little sewing.

I started my Hallowe'en-themed That Cat wallhanging from McCall's Quick Quilts and the background is now finished.


It's ready to have the cat applique added and after that, it should go quite quickly to finish up.  I love the oranges - my favourite colour - and can't wait to see it on the wall!  I'll keep you posted on the progress.

Linking up to Freshly Pieced:

August 02, 2015

Harmonic Convergence

OMG, I finally finished one of my long-overdue UFO projects!  It's amazing to see what you can get done with the right tools for the job (thanks, Janome!).

Back in 2011, some friends and I had a sewing day together and we whipped up these Ricky Tims harmonic convergence wallhanging tops:


Four years on and after a lot of bother replacing border fabric I wasn't happy with, and this project is now complete and ready to hang.


Once again, we are having terrible summer weather so my apologies for the poor lighting - lack of sun does that...  Sigh.  But it still looks great, I say.


Here's a peak at the backing fabric, which co-ordinated with the prints from the top.  You can also see the large meander quilting here.


And here is the rest of the quilting.  You can see that I did in fact brave trace quilting all of those little mugs - there were 60 of them, by the way.  And I did freakishly well going around them, too, might I add (for a beginner).  And that loopy doodle quilting line is still my absolute favourite - too cute!


I even managed to get the hanging sash on the back to look cute with all the little mugs lined up.  That was a total fluke - there just happened to be a perfect size of leftover material cut from the border print that worked out but when the quilting gods hand you something this perfect, you need to take advantage of it, I reckon.


Mmmm, binding...  I love binding.  It's possibly my favourite part of any quilt project, which I should now be able to enjoy more often, since I have a machine that will allow me to completely finish projects.  Yeah!

July 31, 2015

Free Motion Quilting

Hello again!

I seem to keep gushing about so many new and exciting (to me) things lately, and I'm going to share another with you today.  Having recently finished my Red Velvet layer cake quilt top, I'd been feeling a little gun shy at the prospects of starting quilting.  But I finally knuckled down and put together some small practise squares, beginning with some meander/stipple quilting and then doing some border doodle designs.

I managed to get my Ricky Tims harmonic convergence wallhanging spray basted without the help of Greta (cat) and then I was good to go!  I decided on a medium-sized meander in the central base of the wallhanging so as to catch all of those seams and to soften the harsh straight lines.


I used a turquoise thread with good contrast against the different fabrics, which was a tip I picked up from one of the FMQ resources I've been trolling recently in preparation for this next step - it definitely helped me to see where I had already sewn, which was a huge help and very useful.  I also really like the look of contrast threads so that made for an added bonus.


In the inner border, I decided on this cute doodle line - I love how playful and whimsical it looks.

Now my next step is trying to decide what to do for the quilting in the outer borders, which feature little hanging mugs.  I would love to trace quilt around each of the mugs, but my FMQ isn't very precis quite yet (although if I do all of them, I'm sure it will improve rapidly!)

And finally, I was looking around for some quilting glove options.  I haven't seen any actual marketed quilting gloves in my area but I did notice this neat gardening gloves at my local grocery store:


They're cotton with a textured rubber on the palms and fingers and man do they grip the fabric!  And the best part, they were a mere 20:kr SEK ($3.00 CAD) - sweet!

July 15, 2015

WIP Wednesday

Hello, hello!

I've been in a whirlwind of sewing lately.  I have so many WIP projects, I simply can't justify starting any new ones without making more progress - and ultimately finishing - some first.  I've had a bit of an on-going list of what really needs finishing:
  1. Jelly roll race quilt - add borders (done!), sandwich & quilt.
  2. Harmonic convergence wallhanging - finish replacing borders, sandwich & quilt.
  3. HST quilt-along quilt - finish sashing, join rows, add borders, sandwich & quilt.
  4. Layer cake quilt - finish building blocks.
In last week's WIP Wednesday, I shared the progress I'd made on my Diamond Jubilee jelly roll race quilt; adding the borders.  Since then, I've moved on to further work on my Harmonic Convergence wallhanging.

First, a little back story: I originally added two borders when I finished the top.  However, I really didn't like the narrow, inner border I put on - it was a weird blue colour that didn't match the turquoise in the rest of the fabrics but was all that was available at the shop at the time.  Then, several years later, I came across a gorgeous turquoise print that matched perfectly!  I went ahead and ripped out the blue border and put in the new turquoise border instead...  Except that when I got to the final top border, it didn't fit.  Argh!

Along the way of fiddling with removing and resewing borders, the fabric stretched, the seams warped and the top border ended up an inch smaller than the width of the wallhanging.  I tried getting that border to fit - tried and tried and tried.  I'm sure I sewed it on and ripped it off three times before giving up, fearing that if I fussed with it any more, I'd just make it worse.

Well, I sat down recently and decided I wasn't going to let this project get the better of me!  After a thorough starching and pressing, I matched up the cornerstone seams and tacked them for good measure, pinned it to within an inch of life and at a snail's pace, stitch by agonisingly slow stitch, I eased that border into place and viola!


That border up there at the top?  That's the culprit.  But isn't that turquoise border lovely?  I'm sure the final effect will well be worth the effort.  Here's a closer look at that tricky border:


Looks harmless enough, doesn't it?  And just for good measure, here's a little detail shot across the wallhanging's piecing.


Now it's ready to be sandwiched, quilted and bound.  Hopefully I'll be able to hang it in my kitchen soon.

Linking up to Freshly Pieced:

http://www.freshlypieced.com/

October 06, 2014

Guild Exhibition - Part II

Hi again!

This is part II of my quilt guild's 10-year anniversary exhibition, which was held recently September 26-28.  Be sure to also check out part I and part III.

So today I thought I would share our exhibition challenge event, my Haberdashery group's challenge display and my own projects I entered.  Let's start with the very impressive challenge event.

Challenge: Celebration
The challenge theme was celebration and entries could either be a wallhanging or a bag.

Challenge Entries

Okay, I'll admit, I was biased toward the wallhangings so while the bags did also receive their own first, second and third place winners/prizes, I only photographed the wallhangings.  Sorry, don't hate me.

1st Place: Marion Loftberg

2nd Place: Birgitta Hortin

3rd Place: Name Unknown

My friend Ingrid also submitted an entry into the challenge.  Both she and Birgitta included the tiniest little LED lights onto their wallhangings, but unfortunately not all of the lights were turned on or working - shame.

by Ingrid Hortin

Haberdashery Challenge
Then my Haberdashery group had all of our Persian Pickle (mine and the group's) projects on display.  They looked fab!  Shame the lighting isn't better but they looked nicer in real life.

Haberdashery Challenge

My Submissions
And finally, I submitted a few things of my own to the exhibition; not many since I have a very bad habit of not finishing my sewing projects without great effort but still...

Happy Spring Wallhanging

Mobile Phone Holder

Woven Milk Carton Basket (large blue one)

And finally, Ingrid, Birgitta and I submitted the baby quilt we made at the start of summer for a co-worker who was due mid-June.  More information on this particular project will be shared in the coming month.

Bugsy Baby Quilt

All right, that's it for part II!  Thanks for stopping by.  The final part III will be shared shortly so please stop around again for the final photos.

August 22, 2014

Persian Pickle Project 2014 - Part II

Welcome back!

So as you know, my Haberdashery group had our big reveal this Tuesday of all of our Persian Pickle-inspired projects.  In case you missed it, I shared my wallhanging here.

Today, however, I wanted to share with you the wallhangings the other ladies in my sewing group made.  I know, how exciting!

Tea Time by Ingrid

Birds by Karen


Houses by Lena N.

Cottage by Annika (WIP)

Attic Windows by Britt

Cathedral Windows by Hanna

Dresden Plate by Lena F.

Singin' in the Rain by Birgitta (held by Ingrid)

House in the Woods by Inger (WIP)

Flowers by Marion

Puzzle Pieces by Lisbet


This was such a fun project, I'm hoping we continue to do a group project each year.

August 20, 2014

Persian Pickle Project 2014

Hello, hello!

I'm so excited to be sharing a completed project with you today!  In case you haven't yet noticed, I'm not always (cough, cough - usually) very good about finishing sewing projects...  But this one had a deadline and I usually work well towards deadlines (if you count waiting to nearly the last minute as working well - thanks, Mum).  Anyway, personal foibles aside...

You may recall that at the beginning of the year, my Haberdashery sewing group had decided to do a group project based on the fabric swapping principle behind the book The Persian Pickle Club.  You can find the full details of our project in this post.

In February we made our fabric swaps, which you can read up on in this post.  And here is the photo of all our fabrics together (unsurprisingly, mine is the orange dragonfly print).


Right from the beginning I had an idea of what I wanted to do for a design - a paper pieced circle of geese blocks.  I had intended on using basic white as the background colour but since so many of the fabric contributions were pale or light coloured, a darker background would be necessary.  Except that I didn't want to use black, because it felt very flat so instead I found a mottled brown with warm and cool tints throughout it; it's not really my style but I think it works with the rest of the prints and sometimes you've got to work outside of your comfort zone.

And so...the big reveal!


Ta da!  The wallhanging finishes at 40cm square (as stated in the project requirements).  It features a central circle of geese block in counter-clockwise rotation (yeah, I'd meant to do it clockwise and printed off the wrong pattern by mistake - oops but not the end of the world).  I added a one inch border into which I used some off-cuts of the fabrics to lick & stick tiny geese around the edges using odd numbered groupings and gaps for added interest.

The quilting was a little challenging as my machine is quite old; so old it's been impossible to find a quilting foot that will work with it so I had to go slowly with a regular sewing foot and ease in fabric manually where needed.  My machine can also sometimes have tension issues when quilting but luckily I seemed to find the right combinations of settings this time around.


Originally I had thought to reinforce the circular concept by quilting concentric circles in the center.  Unfortunately you can imagine my dismay (and laughter) when I realised that I'd effectively quilted a bulls-eye into the center of my geese...  Open season, anyone?

Time for Plan B: geese flying by star light.  I stitched in the ditch around the large central star shape and added some additional lines in each arm of the star.  Then I drafted a smaller star template which I quilted into the corners.  For the geese I stitched in the ditch around each goose and then added arched lines on the insides.  I repeated this quilting on the small one inch geese in the borders (not easy, I can assure you).  I also quilted simple geese shapes into the rest of the borders; 12 geese per border, one every inch and some I reversed, again for interest.


The final touch, I recorded the project and contributors on the hanging sleeve on the back.  This Tuesday we will be revealing all of our wallhangings to each other at our next Haberdashery meeting.  Then the whole collection will be put on display at our guild exhibition end of September, which will be exciting.